Note that the title’s joke only works if you use the correct pronunciation of Godot. 😉
As much as I’ve loved using Godot over the years, one of my biggest pain points had been grappling with positioning UI nodes. I work as a web developer for my day job, so I work regularly with CSS. Compared to that, Godot’s UI didn’t feel intuitive, and anything more complex than full-screen positioning frequently resulted in nodes placing themselves in ways I didn’t expect, and it felt like I spent hours duct-taping an interface together. I scoured whatever documentation I could get my hands on, but nothing seemed to help much in the end.
Recently, however, I’ve had some tremendous breakthroughs in my understanding of how Godot’s UI positioning system works. The result is that I now understand that Godot’s UI is actually very simple to use, almost brilliantly so. Suddenly, I was able to put together complex UI scenes easily, and comprehend why my UI looked the way it did. Given all the frustration I’ve felt over the years, these realizations have felt almost miraculous.
I wanted to codify my newfound knowledge in this blog post. Not only will this be a reference I can look back on to refresh my memory, it will help people struggling with Godot’s UI to gain the perspective I have, and thus make UI work a breeze instead of a hurricane.
This is not a tutorial on how to make good UI, but an explanation of how Godot positions UI nodes. That said, I made a Godot project to help illustrate my points, and I’ve made it available for you to download and reference for your own edification.
The project was originally created in Godot 3.5, but I tested opening it in 4.0 and nothing seems to have changed for the worse. The UI around anchors/margins is different, as called out on Twitter by Jaysen Huculak, but the underlying principles are still the same.
Anchors
Let’s start with the first of the foundational elements of UI positioning: Anchors.
Anchors control the boundaries of where a node and its content are drawn on the screen. The unit of measurement is literally, that: a unit, from 0 to 1. What is the unit’s reference? The parent node’s size, which starts from the pivot (which is the 2D coordinate where the node is “located” in UI coordinate space) and extends across horizontal and vertical axes to the full size of the parent node. 0 means you are at the start of the axis (horizontal for left/right, vertical for top/bottom) and 1 means you are at the end of the axis.
That’s tricky to parse with words alone, so let’s look at some images to illustrate how this positioning system works.
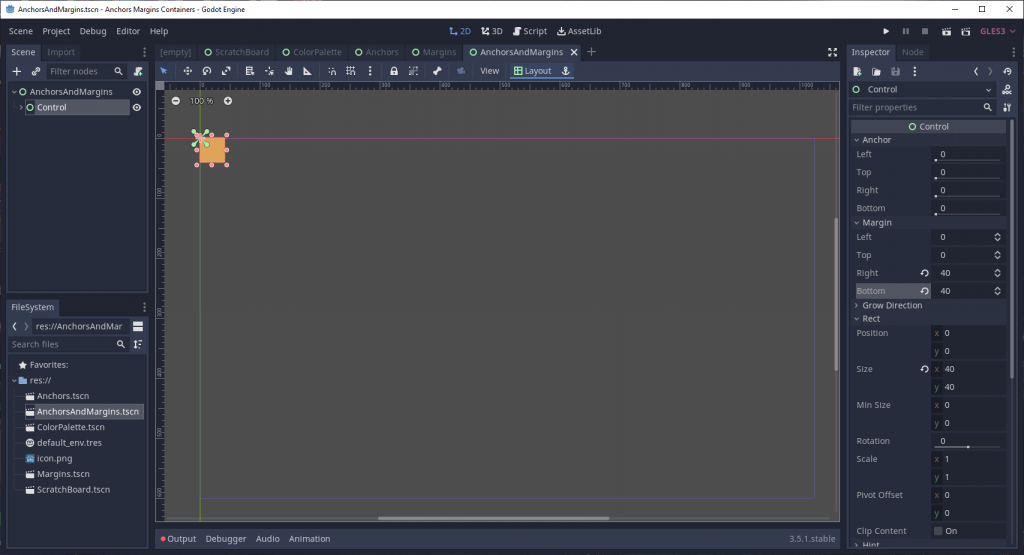
Note that this is the Godot 3.5 interface. In Godot 4.0, these properties are nested under the Layout dropdown section.
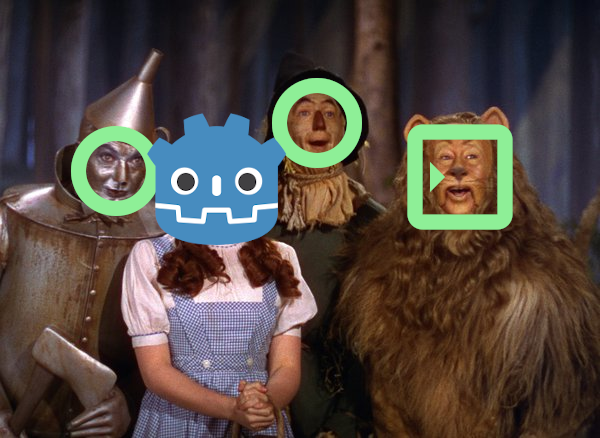
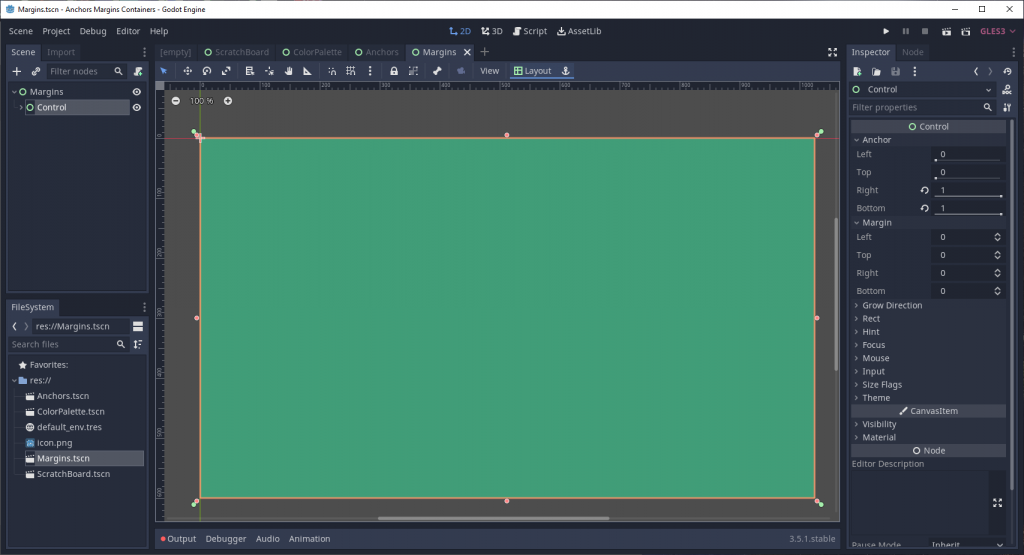
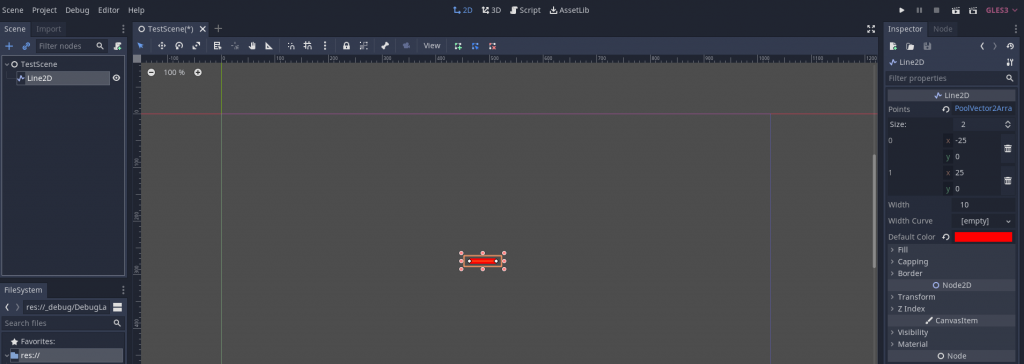
The above is a simple Control node that is the child of another node that fills the entire viewport. Note that all the anchor values have been set to 0. Correspondingly, the node’s size is also zeroed out, so you can’t see anything of that node’s contents.
If you create a Control node with Godot’s editor interface, it will not look like this despite also having 0’s set for the anchors. I’ll explain why later in the article.
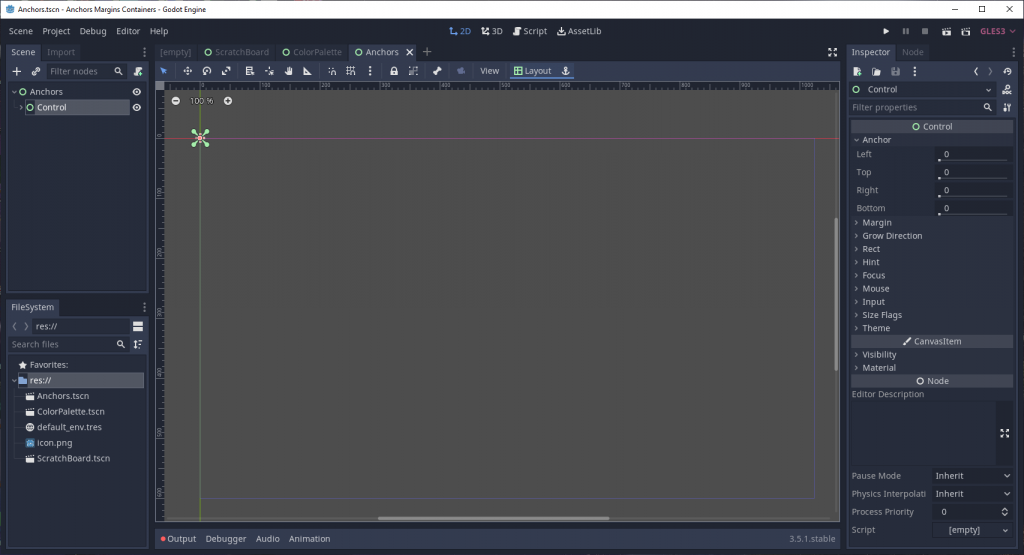
Let’s see what happens when we set the right and bottom values to 1 (or 100% of the parent’s size horizontally and vertically).
Suddenly, our node stretches fully across the available viewport space. By setting right to 1, we told Godot to expand the right edge of the node all the way across the parent node’s bounding rectangle, across the horizontal axis; it’s the same story with setting bottom to 1, but on the vertical axis of the bounding rectangle, instead.
In Godot 4, the anchors are abstracted behind a helper menu interface. To change the values manually, you have to set the anchors preset to “custom”, which exposes the raw numbers. Thanks to Rob for the comment pointing this out!
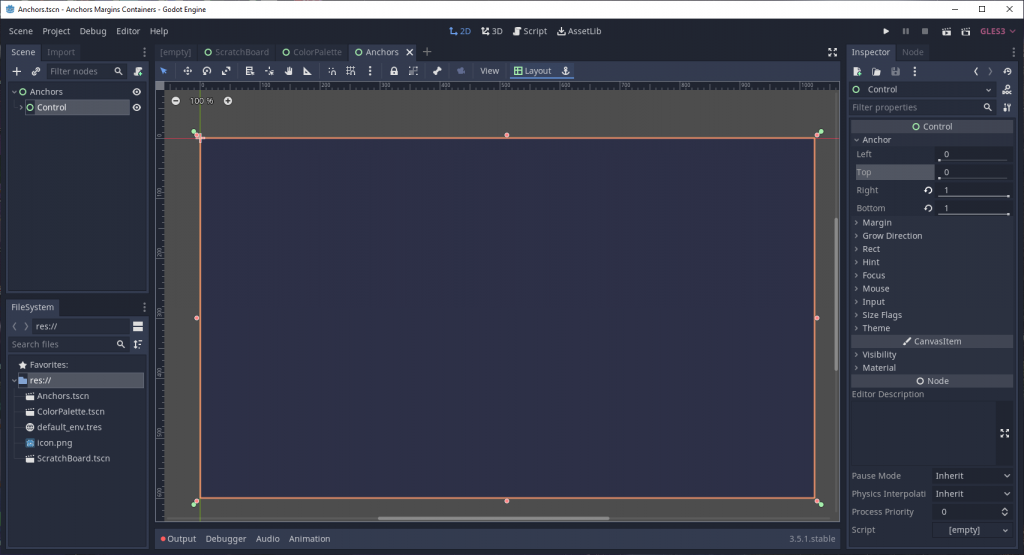
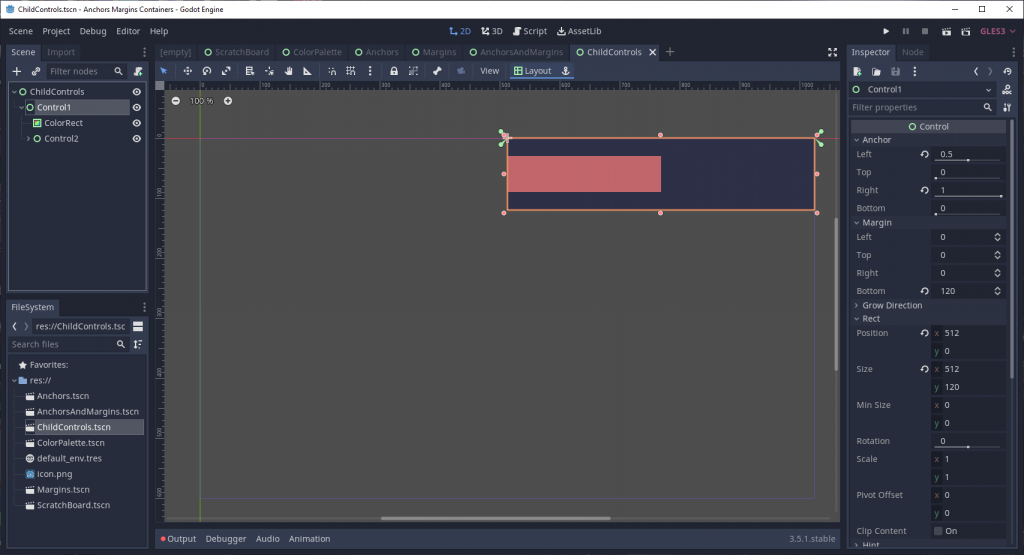
Just for fun, let’s change the left and top values to 0.5 and see what happens.
Now our Control node looks like it’s in the lower-right corner of the viewport. Essentially, we told Godot to move the left and top edges of our node 50% away from the parent’s pivot origin.
I’m not showing this in the screenshots, but I placed a ColorRect within the Control to make it more obvious how much space it’s taking up. It’s essentially just filling whatever space our Control node is, and isn’t needed in any functional way.
Anchors are just one part of Godot’s UI placement equation. Another critical part of that equation is Margins.
Margins
Margin controls the amount of spacing used from the specified edge. Where Anchors are placed using percentile units, Margins use pixel units.
In Godot 4, margins are called “offsets”. Same concept, different name. Thanks again to Rob for pointing that out!
Let’s take another example Control node, with anchor values right and bottom set to 1.
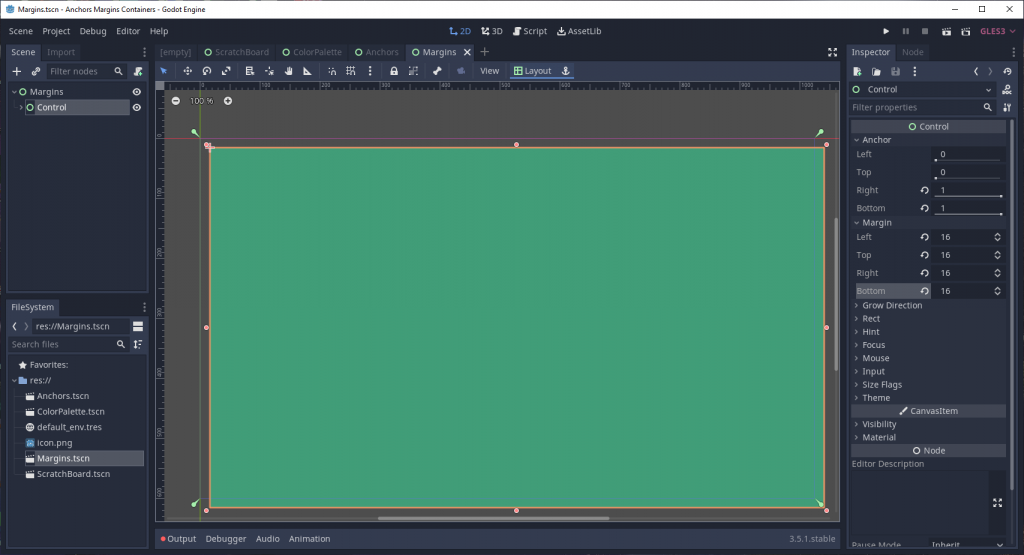
Currently, the viewport is completely filled. Let’s try adding some margin around the Control so that there’s 16px of space around it.
…wait, that doesn’t look right. There’s 16px of space around the top and left of the Control, as we expected, but the bottom and right sides got pushed outside of the viewport’s visible area.
Why did that happen? It’s simple: Godot doesn’t treat margin as distance into the bounding rectangle. Instead, Margin gets applied along an axis of direction; positive margin is to the right/bottom of the specified edge, while negative margin is to the left/top of that edge.
This is different from how margins work in CSS, and is a big reason why I misunderstood Godot’s UI for so long.
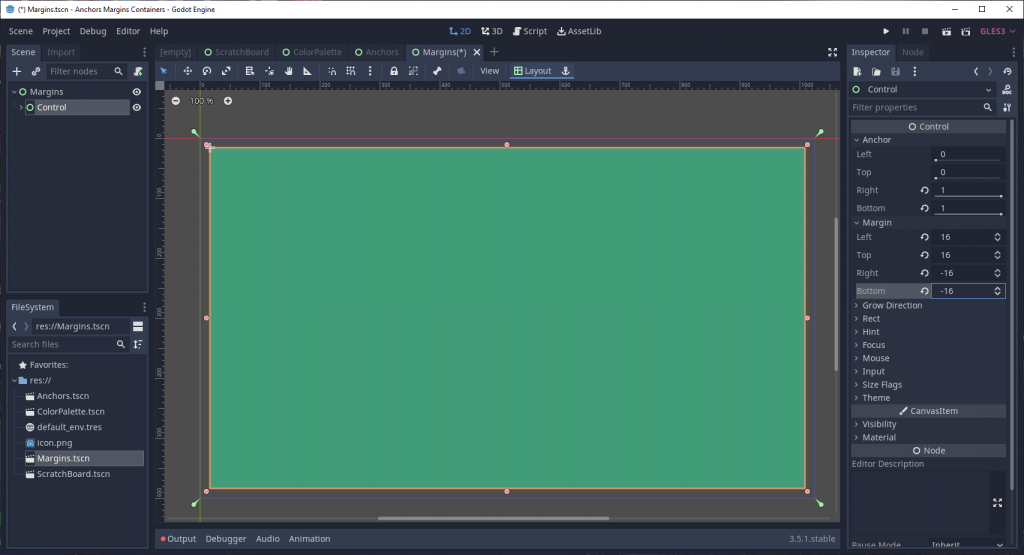
To get the spacing effect we want, we need to apply negative margin values to the bottom and right margins.
That’s more like it.
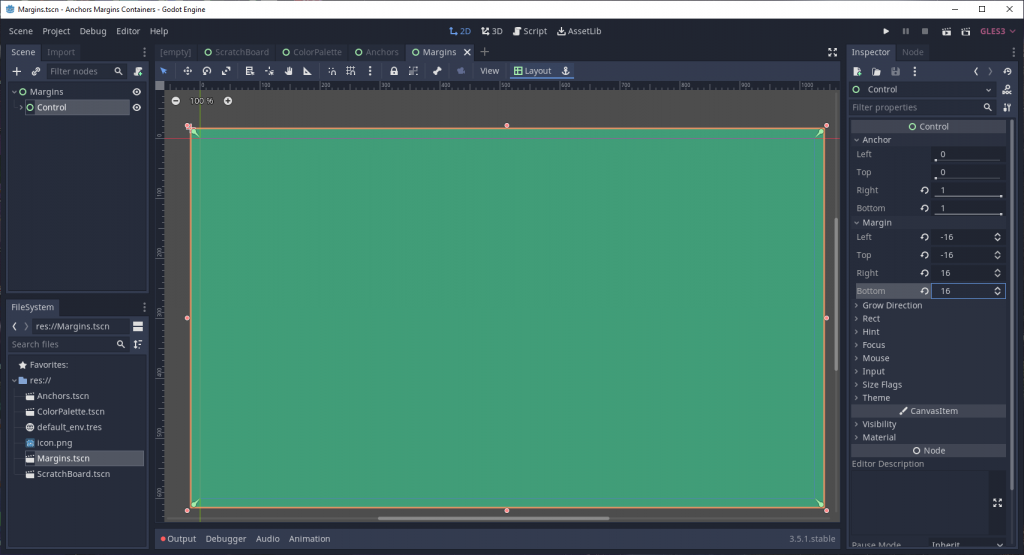
Just for fun, though, what if we wanted to have our Control’s width exceed the bounding rectangle of the containing node? Simple, we just make the left and top margins negative, and the right and bottom margins positive.
Earlier, I glossed over the fact that creating a new Control node in Godot’s editor doesn’t actually create a node with no size, despite anchors being set to 0. That’s because Godot defaults the new Control’s right and bottom margins to 40px, which results in giving them a default rect_size of Vector2(40, 40). I don’t know of official documentation explaining why, but my guess is that this is to try and minimize confusion around why new controls have no size.
Wait, what’s rect_size? How is that related to margin values? Good questions!
How Anchors and Margins Impact Other Control Properties
While Anchors and Margins are the core aspects that determine a node’s position and size, they do so in coordination with other node properties. Changing the anchors and margins of a node will usually automatically adjust these tangential properties, and vice versa.
Let’s go over what these properties are.
Rect Size
The rect_size property is the actual size of the control node. This can be set directly, but often this gets readjusted based on the settings of the anchors and margins. The important thing to remember is that this value always represents the node’s actual size in-game.
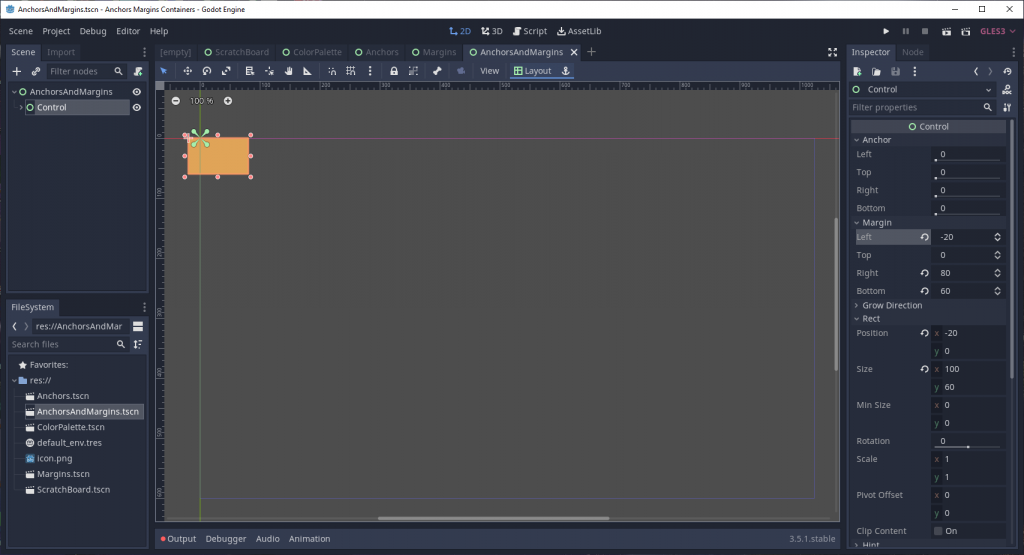
Rect Position
rect_position is the point where the control “is” in the game’s UI space (aka it’s point of origin). Like rect_size, this can be set manually, and is also automatically adjusted based on interactions with anchors and margins.
See how the right margin for this control is 80, but the left margin is -20. This makes the control’s size 100 (80 + 20) and its X coordinate -20.
Rect Min Size
The rect_min_size property forces Godot to never shrink this particular node below the specified size. Unlike rect_size and rect_position, this is never adjusted automatically by Godot. It’s useful for when you absolutely need to have a control not shrink below a certain size, but be careful: it’s easy to abuse this property to hack around badly-set UI properties. (I certainly used it this way!)
Layout Presets
At this point, if you’ve worked with Godot’s UI before, you may have realized something: “This feels awfully similar to what happens when I use the Layouts button!”
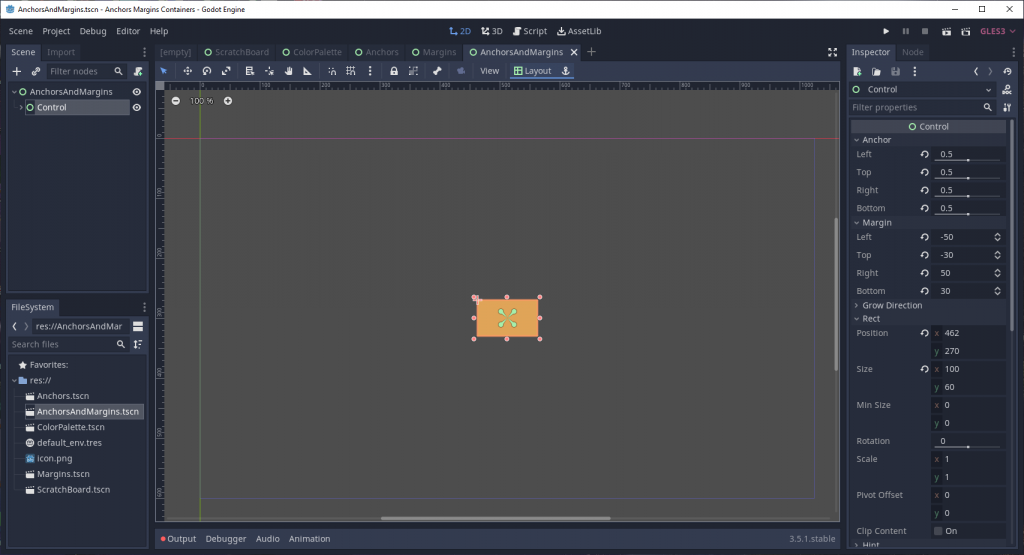
That’s because those Layouts are nothing more than common presets for the anchor and margin values. For example, “Full Rect” is the exact same thing as setting top and left anchors to 0, right and bottom anchors to 1, and all margins to 0. Meanwhile, the “Center” preset sets all anchors to 0.5 (aka 50%) and then automatically calculates the margin values such that they are half of the node’s minimum size, resulting in a centered node.
This is the same 100×60 rectangle from the previous image, but with the center preset applied. Note the difference in not just anchor and margin values, but the rect_position as well.
The presets specified were common enough that Godot’s developers decided to make a convenient way to set them, but it can be confusing when you try to use them without understanding how the underlying system works. I’ve definitely had confusion about why a previously “centered” control wasn’t updated automatically when I did something which changed the node’s size. The reason why is because the presets don’t automatically update in response to changes; they just act on whatever you have architected at the time they get used. Thus, if I change something which affects the node’s size, I need to reapply the “Center” preset to get the node to look centered again.
Child Control Nodes
What happens if you change anchors and margins for a child node? Exactly the same thing as changing those values for its parent! All the examples I’ve used to this point have had nodes be children to a root node that matches the size of the viewport, but the viewport itself is completely irrelevant to the sizing of nodes. If you have a sized control, and adjust the anchor and margin values of its children, they will fit within that parent control’s space.
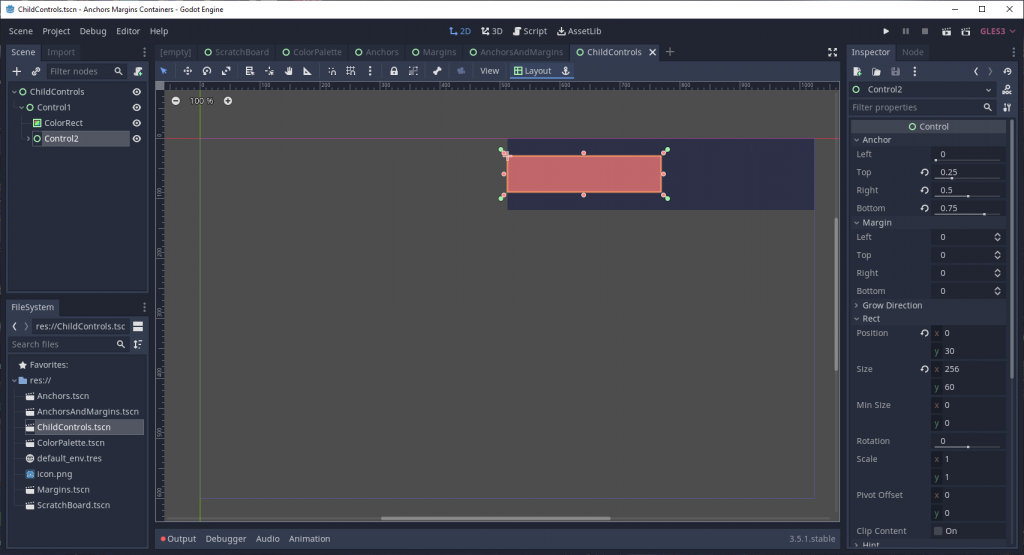
This control has it’s anchors and margins set relative to the viewport-filling parent…
…while its child’s anchors and margins are relative to its own bounding rectangle, instead.
That’s incredibly powerful and predictable, to have a UI system which functions the same for every Control-based node in Godot.
Well, almost all nodes…
Container Nodes are Exceptions
There is a class of node in Godot called a Container. Container nodes themselves can be sized with anchors and margins, just like any other node. However, the children of container nodes get automatically sized and positioned by that container’s internal logic, ignoring (and overwriting) any manually-set size and position values.
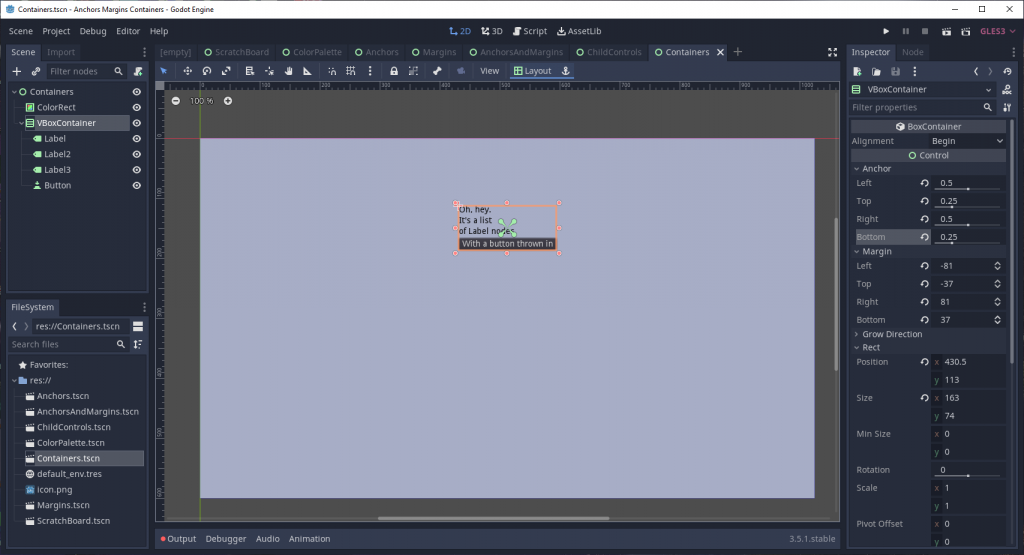
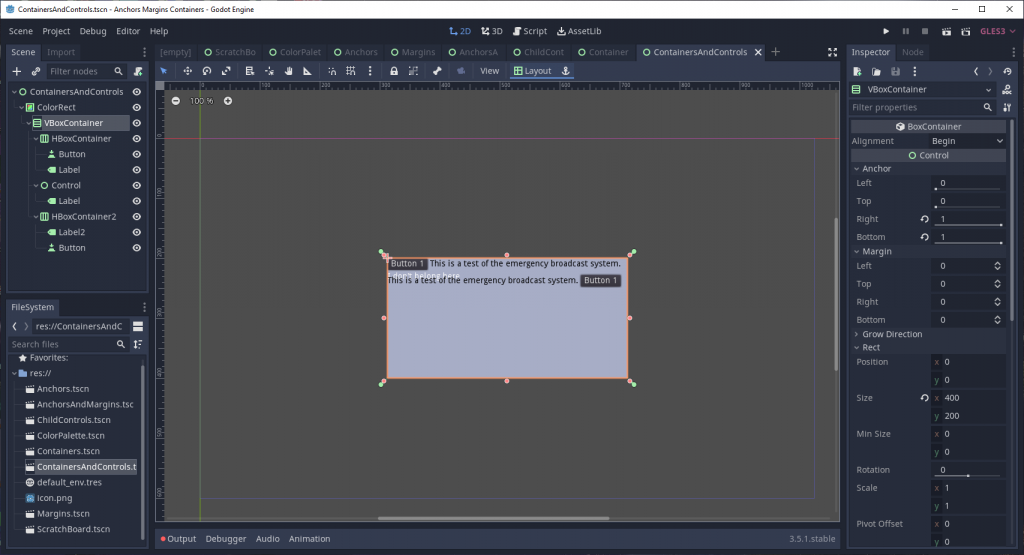
You can position and size container nodes within control nodes via the editor…
…however, if you try to change the anchors, margins, or rect_size of nodes within a Container-based node, those values will be automatically adjusted by the container node.
There are multiple kinds of Container nodes, each with their own internal logic for how children size and position are handled. To give a few examples:
HBoxContainer aligns its children horizontally.
VBoxContainer aligns its children vertically.
GridContainer aligns its children within a set grid of columns.
CenterContainer centers all direct children to its own center.
Godot’s documentation does call out this behavior, and the layout presets are disabled when working within container nodes (the latter behavior to prevent developers from using them in places where they simply won’t work). If you hadn’t understand how the UI system works overall, like me, then these explanations and behaviors may have felt more like descriptions rather than elucidations.
Size Flags
You do still have some control over the placement and sizing of nodes within a Container, through size flags. Size flags have four types of behavior, for both horizontal and vertical axes (all of which can individually be turned on or off).
fill causes the node to fill the space given to it. That space is governed by both the parent container’s size and the node’s own calculated size.
expand causes the node to fill any space within the parent container not already used by another node. If neighboring nodes are not set to expand, they get pushed by ones that do. If adjacent nodes both expand, they split the space between them.
shrink center causes the node to occupy only its minimum possible size, while also centering its own position relative to its neighbors and its parent container.
shrink end is the same as shrink center, but with the position at the end of the available space instead of the center.
Not setting any of the above flags makes the node act as though a shrink begin property existed.
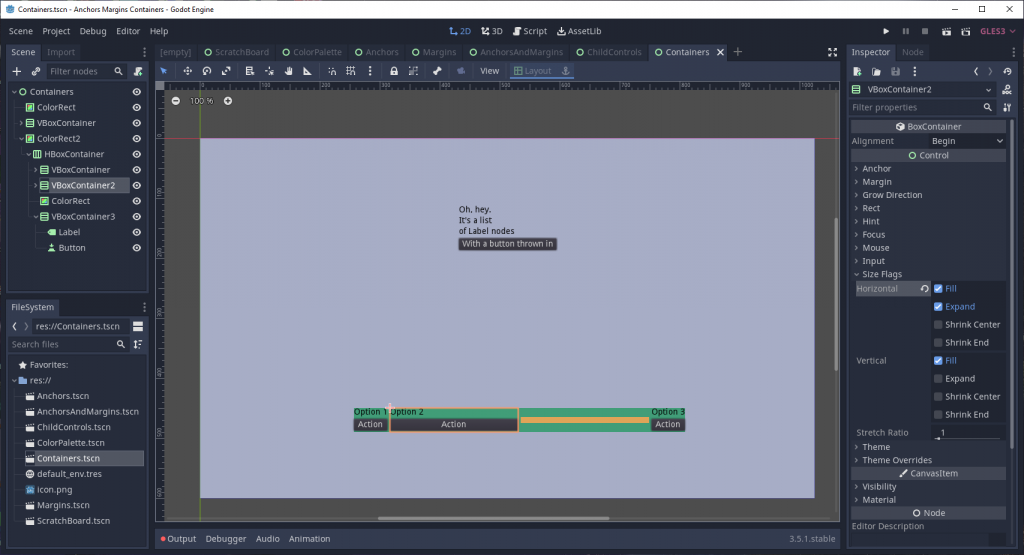
Here, the first and last child nodes only have their fill flags set. The second and third child both expand horizontally, while the third child also shrinks to center vertically. (Since there are no child nodes of fixed size for that third child, a minimum height of 10px needed to be set)
The important thing to remember with positioning nodes within containers is to not worry about getting the nodes in a specific position or size, but to get them aligned according to whatever ratio you’re trying to achieve. The advantage of this approach is that you can place container nodes anywhere within the UI, and they will automatically take care of placing and sizing their children to match that same ratio.
Why Won’t My Control Node Behave in a Container
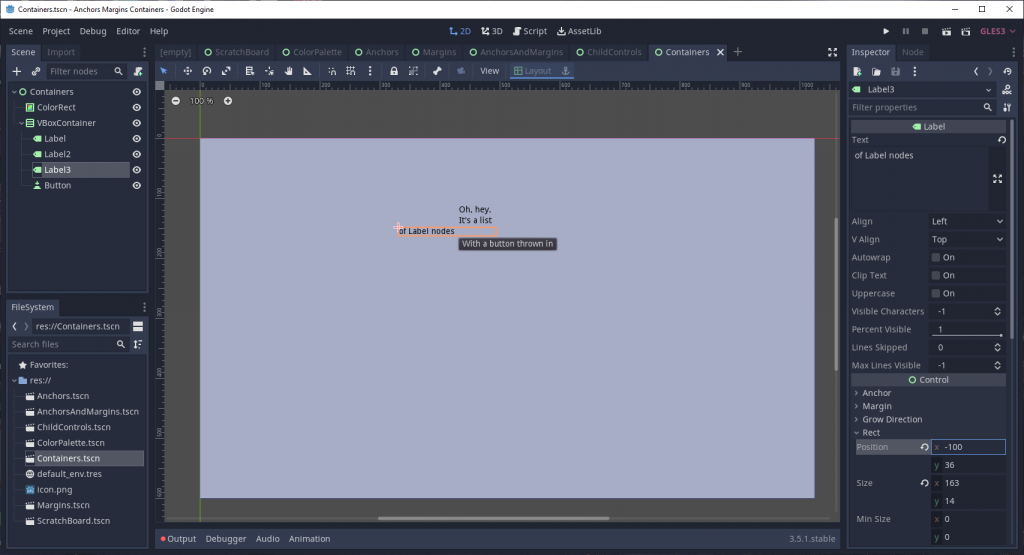
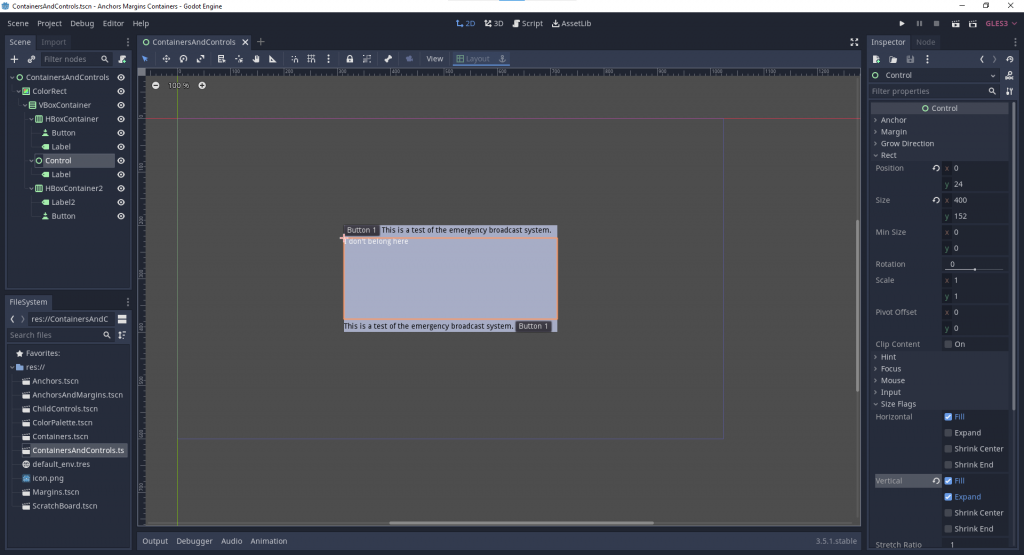
Have you ever tried to put a Control node in a Container node and it behaved like this?
You might need to squint to see the white text that’s out of place.
At first glance, it seems like the Container isn’t size-managing the Control, but that’s not actually the case. The truth is that Control nodes, by default, do not adjust themselves based on the size of their own children. (In other words, Control nodes are not Containers!) In fact, the Control node is resized by the Container, but since the Control isn’t expanding to the size of its children its own size is getting set to 0.
There are two ways to get more expected behavior. One is to put a rect_min_size on the Control node so there is something for the Container to resize.
The other way is to use the Control node’s size flags.
Which one should be used? It will depend on the effect you’re trying to achieve. If you just need the node to occupy space, a rect_min_size should do the trick. For more dynamic size adjustment, changing the size flags works best.
Conclusion
This is how Godot’s UI sizing and positioning system works: Anchors, Margins, and Containers. Now that I understand this, I’ve had a much easier time crafting UI that is placed exactly how I want it to be. The system is simple, but until I grokked how it works it felt confusing and unintuitive.
Hopefully, this post helps you better understand Godot’s UI as well!
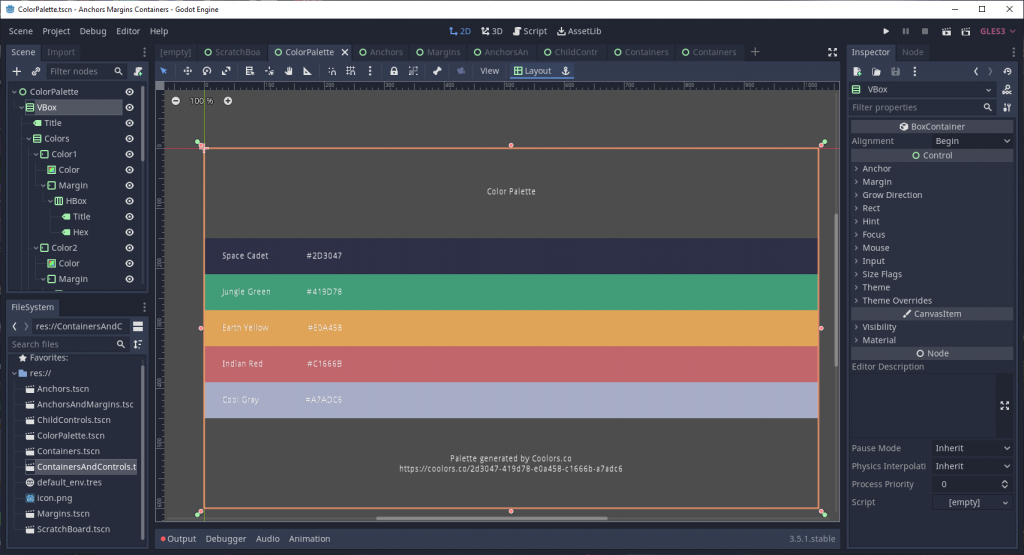
I used this color palette for the ColorRect nodes I used for visualization throughout the examples. It doubles as a nifty display of what you can accomplish with Godot’s UI!
Note: If you implemented this pattern and are now experiencing issues with get_tree() calls, see my Issues with get_tree() section at the end of the article.
Oftentimes, in code, you need a way to have different parts of the codebase communicate with each other. One way to do this is have those components directly call methods from another component. While that works, it means you directly couple those components together. If you want to reuse one component in another project, you either have to take all the directly-coupled components with it or you have to refactor the direct couplings out of the component you want to reuse, neither of which is desirable from a clean code standpoint.
A way to solve this problem is to use the signal pattern. This is where each component can emit a named signal, and other components can then be connected to that signal. From that point on, whenever that signal is emitted by the component, anything that is listening for that signal can run code in response to that emission. It’s generally a great pattern, allowing for code to indicate when some event, or signal, happens, and for other parts of code to respond to that event accordingly (without code directly relying on calling methods from one another).
There is a third way to have decoupled components communicate to one another: the messenger pattern. At surface level, it’s very similar to the signal pattern: a part of your code dispatches a named message, and any code that is listening for that particular message can respond to it. Those different parts of your code aren’t connected to one another, however; instead, they interact through a Messenger node. Code that wants to listen for a message registers a message listener to the Messenger, and when another part of code dispatches a message with that name, the Messenger loops through all the registered listeners for that message name and invokes their callback functions.
Both the signal pattern and the messenger pattern can be considered subsets of the Observer pattern. The key difference is that the signal pattern has many objects connecting to one (the object emitting the signal), while the messenger pattern has a mediator object through which messages are dispatched and listened for by other objects. Which is better? It depends on what you are trying to accomplish architecturally, and there’s no reason you can’t use both.
Let’s discuss specifics, with relation to what Godot uses. Godot has the signal pattern baked into it at the core. Nodes can define signals through use of the signal keyword. Any node that wants to listen for another node’s signal can connect() to that node’s signal and associate a callback function to it. It looks like this, at a simplified level:
# OrdinaryNode
extends Node
signal some_cool_thing

# DifferentNode
extends Node

func _ready():
  # Assuming both OrdinaryNode and DifferentNode are children of a hypothetical parent node.
  get_parent().get_node('OrdinaryNode').connect('some_cool_thing', self, '_do_something_awesome')

func _do_something_awesome():
  print("This is awesome!")
From then on, whenever OrdinaryNode emits the some_cool_thing signal, the _do_something_awesome() function in DifferentNode will run, printing “This is awesome!”
While this is a good implementation of signals, the nature of how the signal pattern works implies some shortcomings. For instance, all signals must be explicitly defined in code. You can’t have OrdinaryNode, as written above, emit a coffee_break signal because the code didn’t explicitly define that such a signal exists. This is by design, as it means you have to plan what your node can and can’t emit. Sometimes, though, you do want to have a more flexible way to communicate with other nodes, and at that point signals can’t help you. This is one thing the messenger pattern can help with, by not requiring you to explicitly define what messages can or can’t be sent.
Another aspect of the signal pattern is that it requires you to have nodes define a connection to the node emitting the signal if you want those nodes to react to the signal. That means those nodes must, by definition, couple themselves to the node emitting the signal (though the emitter node doesn’t know, or care, about those couplings). This isn’t necessarily bad, but it limits how you can architect your code; you have to make sure nodes that need to listen for a specific signal are able to connect to the node emitting said signal. Conversely, using the messenger pattern, you can have nodes connect only to a single Messenger node, which can be simpler to implement.
Godot does not natively implement such a messenger node, however. If we want to use this messenger pattern, we’ll need to make something ourselves. That’s what this tutorial will be about.
Note: What I’m calling the Messenger Pattern is more commonly known as the Mediator Pattern. I came up with the name Messenger before I learned what it is called, and I’ll continue to use it in this tutorial because I think it communicates more clearly what I’m using it for.
Setting Up
There is a sample project, if you want to refer to the finished product.
If you want to code alongside the tutorial, start by creating a new Godot project, then create a GDScript file named Messenger.gd. We’ll make this as the base file that other implementations of messengers can extend to provide their own functionality.
The original project was created in Godot 3. Here is a branch that is configured for Godot 4. (Thanks to valVk for assisting the Godot 4 conversion!)
Adding and Removing Listeners
The first thing we want to do is provide a way to add and remove message listeners. Let’s begin with adding listeners.
var _message_listeners := {} # Stores nodes that are listening for messages.


# Add object as a listener for the specified message.
func add_listener(message_name: String, object: Object, method_name: String) -> void:
  var listener = { 'object': object, 'object_id': object.get_instance_id(), 'method_name': method_name }

  if _message_listeners.has(message_name) == false:
    _message_listeners[message_name] = {}

  _message_listeners[message_name][object.get_instance_id()] = listener
This is fairly straightforward. We take the name of the message, the object that has the callback function, and the name of the callback. We store all that in a listener dictionary (defined as a class property outside of the function) and store it in _message_listeners in the dictionary stored at the key matching the message name (creating a dictionary for that key if it doesn’t already exist). We key this listener in the message_name dictionary to the object’s instance id, which is guaranteed to be unique.
Since Godot implements signals at the object level (Node inherits from Object), I’ll be typing these as Objects rather than Nodes, which allows for any node inheriting from Object to be used as a listener (including Resources).
Next, the ability to remove a registered listener.
# Remove object from listening for the specified message.
func remove_listener(message_name: String, object: Object) -> void:
  if not _message_listeners.has(message_name):
    return

  if _message_listeners[message_name].has(object.get_instance_id()):
    _message_listeners[message_name].erase(object.get_instance_id())

  if _message_listeners[message_name].empty():
    _message_listeners.erase(message_name)
Again, fairly straightforward. We run existence checks to see if a listener exists at that message_name key, and erase it from the dictionary if so. Additionally, if no more listeners exist for that message_name, we erase the dictionary for listeners of that message name.
Sending Messages
Now that we can add and remove message listeners, it’s time to add the ability to send those messages.
# Sends a message and triggers _callbacks on its listeners.
func dispatch_message(message_name: String, data := {}) -> void:
  var message = { 'name': message_name, 'data': data }

  _process_message_listeners(message)
We take a message_name string and a data dictionary (which defaults to be an empty dictionary), store it to a message variable, and pass that variable into _process_message_listeners.
# Invoke all listener callbacks for specified message.
func _process_message_listeners(message: Dictionary) -> void:
  var message_name = message.name

  # If there aren't any listeners for this message name, we can return early.
  if not _message_listeners.has(message_name):
    return

  # Loop through all listeners of the message and invoke their callback.
  var listeners = _message_listeners[message_name]
  for listener in listeners.values():
    # Invoke the callback.
    listener.object.call(listener.method_name, message.data)
This is where we handle triggering the callbacks for a message listener. If there aren’t any listeners for that message name, we return early to avoid doing further processing. If there are listeners for that message name, then we loop through each one and trigger the stored method callback, passing in the message’s data dictionary.
That’s it, as far as the basic implementation goes. But there are a couple of caveats that need to be dealt with.
Dealing with Nonexistent Listeners
One such case happens when a listener’s object is freed, making the stored reference in the listener dictionary invalid. If you try to operate on it, Godot will crash, so we need to provide a way to scan for dead listeners and remove them from storage.
Let’s start with a function to perform both the check and the purge:
# Removes a listener if it no longer exists, and returns whether the listener was removed.
func _purge_listener(listeners: Dictionary, listener: Dictionary) -> bool:
  var object_exists = !!weakref(listener.node).get_ref() and is_instance_valid(listener.node)

  if !object_exists or listener.node.get_instance_id() != listener.node_id:
    listeners.erase(listener.node_id)
    return true

  return false
Multiple checks are used to see if the object exists (I’ve found in practice that I’ve needed both of these, not just one or the other). We also check to see if the instance id of the stored listener matches the id of the listener object we passed in; honestly, I can’t recall when or why that particular scenario occurs (I sadly forgot to write a comment about it in my code), but I know I’ve encountered it in the past, so I continue to include it as part of my check. If the object doesn’t exist, or the ids don’t match, we conclude the listener’s object no longer exists, and thus remove the listener from storage. Finally, we return a boolean value indicating whether the purge was performed or not.
Now we need to modify our existing code to use this function.
func _process_message_listeners(message: Dictionary) -> void:
  # ...existing logic

  for listener in listeners.values():
    # If the listener has been freed, remove it
    if _purge_listener(listeners, listener):
      # Check if there are any remaining listeners, and erase the message_name from listeners if so.
      if not _message_listeners.has(message_name):
        _message_listeners.erase(message_name)
        return
      else:
        continue

    # ...existing logic
The difference is we call _purge_listener before we try to invoke the callback. If the listener was purged, we perform an additional check to see if there are any other listeners of message_name, and erase the dictionary keyed to message_name if there aren’t; otherwise, we proceed to the next listener in the for loop.
That takes care of dead listeners. There’s one more problem we need to address.
Dispatching Messages Too Early
Right now, if we try to send and listen for messages during the ready process (when Godot’s nodes all run their _ready callbacks), then we’ll likely run into issues where messages are dispatched before the listeners of those messages are registered (because their ready callbacks run later than when the messages are sent). To solve this, we’re going to add a message queue. If a message is being dispatched before the root node of the scene tree is ready, we’ll add the message onto this queue, and once the root node emits its ready signal we’ll process all the messages in the queue.
Let’s start with setting up the message queue, and modifying our dispatch_message function.
var _message_queue := [] # Stores messages that are being deferred until the next physics process tick.
var _messenger_ready := false # Is set to true once the root node is ready, indicating the messenger is ready to process messages.

# Sends a message and triggers _callbacks on its listeners.
func dispatch_message(message_name: String, data := {}) -> void:
  var message = { 'name': message_name, 'data': data }

  if _messenger_ready:
    _process_message_listeners(message)
  else:
    _message_queue.push_back(message)
We’ve added two new class properties, one to house the message queue and the other to mark when the messenger node considers itself ready. dispatch_message has been modified to first check _messenger_ready, and if so it runs the code the same as before. If the messenger node is not ready, then the message is pushed onto the message queue.
Now let’s set up the ability to process the message queue.
func _ready() -> void:
  get_tree().get_root().connect('ready', self, '_on_Root_ready')


# Is called when the root node of the main scene tree emits the ready signal.
func _on_Root_ready() -> void:
  _messenger_ready = true
  _process_message_queue()


# Process all messages in the message queue and reset the queue to an empty array.
func _process_message_queue() -> void:
  for message in _message_queue:
    _process_message_listeners(message)

  _message_queue = []
In Messenger’s own _ready callback, we register a listener to the scene tree root’s ready signal. The callback then sets _messenger_ready to true and calls a function, _process_message_queue(), which loops through each message in the queue and calls _process_message_listeners() on them. At the send, we clear the message queue, since we don’t need (or want) to process these messages again.
Creating a GlobalMessenger
At this point, we have a base Messenger class that can be used anytime we want to implement the messenger pattern in our code. Let’s demonstrate this by creating a global singleton, GlobalMessenger, that we can interact with from anywhere in our codebase.
Start by creating a new file, global_messenger.gd, and have it extend our Messenger class. If Godot claims the Messenger class doesn’t exist, then you’ll need to reload the project to force Godot to update itself and recognize the Messenger class we added in Messenger.gd.
# Creates a global messenger that can be accessed from anywhere in the program.
extends Messenger
The reason I made this file name snake_case is because my personal convention is to name files that are solely used as singletons with this format, to distinguish them from files containing extensible classes. This is my personal preference only, and is not required to make this code work.
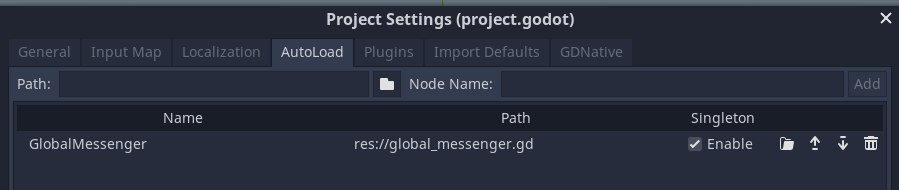
That’s all that needs to be done from a code standpoint. To make this a globally-available singleton, we need to go to Project -> Settings in the editor menu, navigate to the AutoLoad tab, and add global_messenger.gd to the list of autoloaded files.
And…that’s it! We now have a global singleton that we can use from anywhere in our codebase to dispatch messages!
Deferring Messages
Let’s add some additional functionality to our global messenger. For instance, right now, once the messenger is ready, we immediately run listener callbacks upon receipt of the message. What if we wanted to defer message dispatches until the next process tick? It might prove useful to ensure all game data is updated by the time your message callbacks are being run.
We already have a message queue that is used to make sure messages are deferred until the messenger is ready. We can build on that to add functionality to intentionally defer message dispatching until the next physics process tick.
func _ready() -> void:
  set_physics_process(false)


func _physics_process(_delta) -> void:
  ._process_message_queue()
  set_physics_process(false) # We don't need to keep updating once messages are processed.


# Queues a message to be dispatched on the next physics processing tick.
func dispatch_message_deferred(message_name: String, data := {}) -> void:
  _message_queue.push_back({ 'name': message_name, 'data': data })

  set_physics_process(true)
First, we use _ready() to disable physics processing. That’s because, whenever _physics_process() is defined in a script file, Godot automatically enables processing. We only want to process when there are messages in queue, so we just disable physics processing right off the bat.
I use _physics_process instead of _process to ensure messages are processed at a consistent rate. physics_process is run a consistent amount of times per second, whereas _process is run as often as possible, and I’ve found that having messages processed as fast as possible can result in unexpected complexity when sent from code that is expecting a consistent frame rate.
Next, in the _physics_process() callback, we call _process_message_queue(), then disable physics processing again (basically, only running the update step a single time).
Finally, we create a new function, dispatch_message_deferred, making it obvious that calling this will be different from a regular message dispatch. We add the message straight onto the message queue. Afterwards, we set the physics processing step to be true. This way, the next time _physics_process() callbacks are run in the code, the global messenger’s _physics_process() callback will be run, too. And since it is a global singleton, it will be run before other nodes in the root scene.
That’s it!
Testing our Implementation
Now that we have a Messenger node, and a GlobalMessenger implementation of it, let’s set up a test scene in our project to test their functionality and make sure they work as intended.
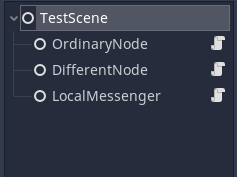
Create a new scene, TestScene, then structure it thusly:
LocalMessenger is a node which is extended from Messenger; we will use this to test that a locally-built implementation of our messenger node works.
The other two nodes, OrdinaryNode and DifferentNode, should contain the following code:
At this point, if you run the scene, you should see the two messages printed to console. If you do, then everything was set up correctly!
Issues with get_tree()
Recently (in May 2023), I encountered a strange bug where a message callback that invoked get_tree() was not returning the scene tree, despite the node housing the callback function being in the scene tree. After some investigation, I realized that I was calling the add_listener() function from the node’s _ready() callback; when I switched to adding the listener in _enter_tree() and removing it in _exit_tree() the get_tree() call worked as expected.
I admittedly am not entirely sure why this works, but my theory is that adding the listener during _ready() is either storing the reference to the function call when the tree is not yet defined or subsequent tree exits and enters is causing the reference to be lost. In any case, I wanted to add this addendum in case anyone else chose to implement this pattern and ran into the same problem.
If you happen to know more info about why this might have happened, please let me know!
Conclusion
We now have a base Messenger node, as well as a GlobalMessenger singleton that extends it and adds defer functionality to it. When should it be used? Personally, I use the messenger pattern in cases where I want to enable node communication, but for whatever reason it doesn’t benefit me to define the specific signals ahead of time, which is when the messenger’s dynamism comes into play.
Of course, that dynamism leads to the risk of making messy code. One advantage to explicitly forcing signals to be defined is that it forces you to think about how you are architecting your code, by making you think clearly about how your signals are going to be used. Since Messenger lets any node send whatever message it wants, it falls on you to make sure that power isn’t abused to send messages when the situation doesn’t call for it. For instance, if you have one node which you want other nearby nodes to listen for a specific event from, you don’t need the dynamic nature of Messenger; signals work perfectly fine, and are a cleaner way to get the job done.
As with all things, in life and code, consider carefully how you do things, and use whatever tools and patterns best fit your needs.
As a programmer, I spend a lot of time figuring out how things should be named and organized. I want things to have readable, comprehensible names, and to be organized in ways that make sense to me. To that end, when I started out in game development, I wanted to figure out how I should organize the files and directories in my game code.
Surprisingly, I’ve found little in my internet searching that speaks to this topic, nor to how things should be named. It just doesn’t seem to be talked about much, and I think that’s a shame. Sure, in the end, the game’s logic doesn’t care where you place your files, or what you call them, but having an understandable code base makes it easier for you to comprehend what particular files are for, without having to look directly at the code or the places that code gets used, and having easy understanding of your code makes for easier development. To that end, I’m writing a high-level overview of my current project, Sanity Wars Reimagined, which contains my latest iteration of my code’s architecture. I’ll show the high-level directory structure, and explain how I came to name those higher-level directories.
Is it something that you should take as gospel and use for all of your projects? No, because everyone’s code needs are different, which is probably part of the reason why articles and videos on this topic aren’t easy to find. What I intend this article to be is an overview on how I structure things and why I do things the way that I do. Hopefully, someone who is looking for inspiration on how to organize their own code might see things they like and incorporate them, saving them the time it took me to figure those things out through trial and experience.
I’ll be the first to admit that, even though generally I like where things are at now, there are still aspects that I’m not entirely satisfied with, so even though I have guidelines on how I should structure things, if my guides don’t make sense, I’ll break away from them to try something that seems better. If they do prove better than my old ways, I’ll incorporate them into my next project. There’s a few instances of this happening in SWR, and I’ll point them out as I go through my code base.
The Project Directory
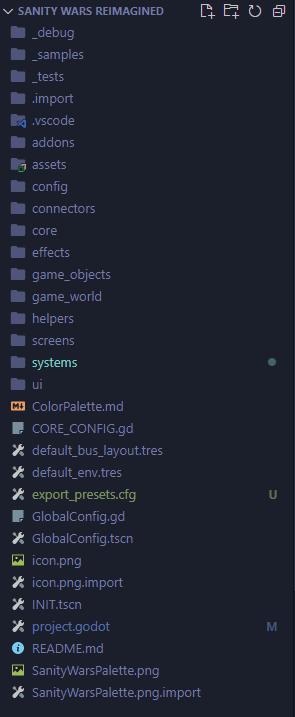
Without further ado, here is the top level of my SWR directory:
I like to keep my top level relatively simple. The things that go here (other than Godot and VS Code-related files) represent the highest-level reduction of a collection that I could think of. I don’t like seeing too many files and folders at once, as it makes it harder for me to scan the architecture at a glance, so the more I can reduce things, the better.
Note that I’m using Visual Studio Code. Godot lets you plug in third-party editors to use in place of its own built-in editor, and since I use VSC for my day job (web development), I also use it for my game development. There are also things that an external editor shows you that Godot’s editor hides, like markdown files (which I use for my README files) and JSON files (a file format I work with for some kinds of data).
While I’ll generally avoid going into the specifics of how any particular file or system works, I do want to take a moment to explain one particular file in the project directory, the INIT.tscn file. I have a Godot boilerplate project (which I call “Genesis”) that I clone whenever I want to start a new project. Having boilerplate to start with means I can take things I liked about previous projects and incorporate them in a generalized form, so all future projects I make benefit from what I’ve made in the past. How does the INIT file factor into that? That’s the file I’ve marked as the default scene in the Godot project config, and it reads a value in CORE_CONFIG.gd that tells it which screen file I want it to load first. Note that I said screen, not scene. I’ll get more into what screens are later on.
Why not just change the default screen with each project instead of changing my own config value? To give the short explanation, it gives me a consistent, expected environment for my global scripts to hook into. There might be better ways to do it, but this is what I’ve come up with for now, and it works well enough that I haven’t felt a pressing need to change it. An important aspect of architecting code is that there will be plenty of times you feel something isn’t ideal, but running with a slightly imperfect solution is better than spending a lot of time trying to come up with a perfect solution, only to find later on that future scenarios render that perfect solution imperfect. Iteration makes perfection.
Now that we’ve seen everything at a glance, let’s look at each of the top-level directories in my project.
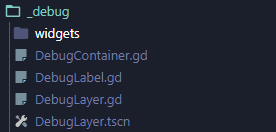
_debug
As explained in previous tutorial posts (starting with this one), I have a custom system that I use to aid with debugging my code in-game, by providing a comprehensive, extensible way to render debugging information widgets. The _debug directory is where I store the code that makes this system work. Since I believe in keeping debug code as isolated from game logic as I can, I keep the scenes and scripts for my debug code in a separate location as well.
Note that I start the directory name with an underscore. In many programming languages, starting a name with an underscore indicates that this is private to some particular scope or class. That’s roughly the idea I’m trying to communicate by using it here. Nothing in _debug is used to make game logic run, so I want the directory name to help communicate that.
_samples and _tests
_samples is something that I include with my boilerplate that contains sample projects demonstrating some of the game systems I’ve built, so I can mess around with them and see how things should look by default. _tests is where all my experiment code goes. If I’m trying to build a new system, I’ll make test directories and files for it in here so I can experiment with the system in isolation before incorporating it with the rest of the game.
One thing about both of these directories is that I specifically filter them out of game exports. These are never intended to be used in my game code, so there’s no reason to include them in official game builds. The reason I don’t do this with _debug as well is because I have to reference the debugging global in my game code to make use of the debugging tools, and I haven’t yet come up with a place to house my debugging global somewhere that makes sense other than in _debug itself. As mentioned before, this is running with a slightly imperfect solution, and if I come up with something that’s better I’ll work it in.
addons
This is what Godot expects you to call the folder which houses third-party engine plugins. I use it for that purpose, of course, but I also use it to house any third-party code (such as GDQuest’s Steering Behaviors AI Framework) that I intend to use exactly as-is in my game code. addons might not be the best name for code serving this latter purpose, but I decided that I preferred to keep all third-party code in a single location instead of using two accurately-named directories, one for proper addons and one for other third-party code. It keeps the top-level architecture simpler, in my opinion.
assets
This is a place where things which are considered resources for other game systems are stored. This includes the obvious in audio and graphics, but also includes scenes that are treated as resources, particles, and shader scripts, among other things. This keeps all those things in one location, and by storing all instances of such things in that one location, I know exactly where to look when I’m looking for anything that I intend to use as some form of content resource.
At the root level of the directory is a README file. This is what I leave for documenting what I intended this directory to be used for, to help future me (and, maybe, future contributors to my game code, should things get to that point) remember what I was thinking. By including this documentation, when I’m considering where to put a new scene or directory, I can refer to a directory’s README file to understand what I intended it to be used for, and see if the new thing I’m making fits that criteria (and if it should fit the criteria and my description says otherwise, I can update the description).
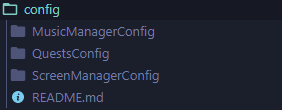
config
This directory is specifically for systems which use some form of scene/node-based configuration, which means they don’t quite fit within the systems directory. This is a new approach I’ve been trying based on past experiences. I’m used to strictly string/file-based configuration files (which is why there is a CORE_CONFIG file at the project level), but making scene-based config files allows for a lot more flexibility in how your configuration works, plus it gives the benefit of using the editor UI to manage your configuration data, which can make for better visual presentation.
Next are the connectors and core directories, but I’m going to skip them for now and come back to them later, as explaining their purpose makes more sense after seeing what the other directories are used for.
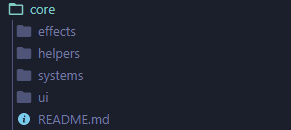
effects
This is a directory where I’ve kept scenes that implement a particular effect, such as a 2D trail or shield bubble. Note from the image that there isn’t anything in this directory other than the README file. That’s because I made it part of my boilerplate code, but by default my boilerplate directories don’t include game-specific code.
That said, I’m starting to wonder if this isn’t better served being part of the assets directory. Effects could easily be considered a form of content. This might be something I refactor out in the future.
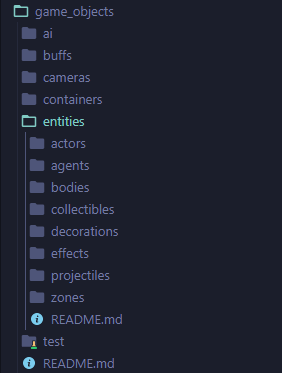
game_objects
In this directory live all of the objects which get used within the game world, or that augment other game objects. The way I architect this file is the one that is most in flux, since depending on what game I build there could be different ways to classify the game objects. To that end, while I include a default set of directories for the game_objects directory in my boilerplate code, I have the expectation that I’ll likely be making a lot of changes to this architecture.
One subdirectory of game_objects I’ll dig more into is entities. This is where I house any game object that is meant to be rendered visually within the game. Here I store things like the player character, enemies, projectiles, decorative objects, etc. As with the rest of game_objects, the specific architecture of the entities directory is going to adapt whatever structure makes sense for the particular project I’m working on.
There is also a test file, which contains some simple test characters. This predates some of the conventions I’ve come up with for my code, like storing all such test code under _tests, so I plan to refactor this out in the future and move the contents to more appropriate places.
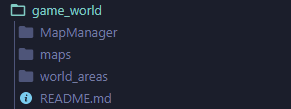
game_world
Here is where I store all scenes that pertain to building the game world. Things like levels, maps, and world areas are included here. Why not make this a part of game_objects, since it could be argued that these are all game objects? I currently think it makes sense to keep things that make up the level formation, such as maps, separate from the objects the populate those worlds. In other words, it’s a personal preference.
The MapManager directory doesn’t really belong here. It’s a system that manages which map is being shown, and although it works with maps, the fact that it’s a system means it would be more accurate to have it be under the systems directory. I’ll probably refactor this at some point.
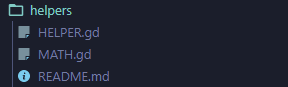
helpers
These are where files containing generalized helper functions are located. For instance, the MATH helper consists of any functions designed around math calculations that Godot doesn’t provide out of the box. If a helper is system-specific, however, then it would stay with the respective system’s directory instead of being placed here.
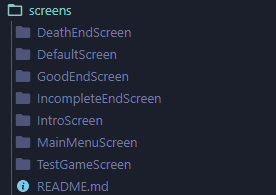
screens
This is where I store screens. What’s a screen? It represents whatever collection of systems, game objects, and UI elements the player is currently engaging with. The MainMenuScreen, for example, contains the main menu interactions and visuals. The IntroScreen is where I show the game’s introductory text, TestGameScreen is the screen where actual gameplay for Sanity Wars Reimagined takes place (someday I might remove the “test” prefix because, well, it’s the actual game screen at this point), and the various end screens are where I show the text you see when an end game condition is triggered.
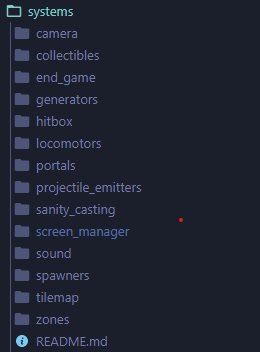
systems
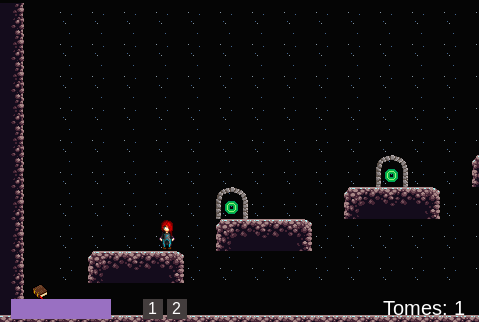
Here reside the various gameplay systems that implement the gameplay for Sanity Wars Reimagined. portals contains the systems logic for making the portals work, while generators contains the base code which is used to control automated spawning of game objects, which is built on for both Eyeball and Tome generation on maps. camera contains the base game objects which implement customized cameras that extend on Godot’s inherent camera nodes.
Didn’t I say game objects belong in the game_objects directory, though? Well, to be more specific, game_objects contains the specific implementations of game objects, whereas any game objects in systems are the foundations on which those specific implementations extend.
Before I move on to ui, I want to go back to one of the directories that we skipped earlier.
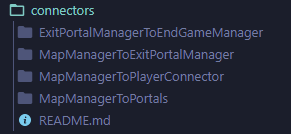
connectors
This directory is exclusively for connecting different game systems together. A connector node is a single node that takes two or more other systems nodes as setup arguments, and then applies any connections and custom logic to make those different systems interact with each other. It seems a little convoluted, compared to just building those connections directly into the systems themselves, but, by doing so, I can build individual systems that handle their own logic without directly relying on other systems, and thereby make them easier to reuse with different systems.
Admittedly, this kind of thing isn’t necessarily useful for the specific implementations I’m making for this specific game; the benefit, in theory, will arise from future projects where I want to use certain systems I’ve built for Sanity Wars Reimagined and connect them with the systems of said future projects. I’m still on the fence on whether this abstraction will actually prove useful, but, for now, this is the best solution I’ve come up with to making my systems reusable. If I find a better way to do it in the future, I’ll implement it.
With that out of the way, let’s jump back to
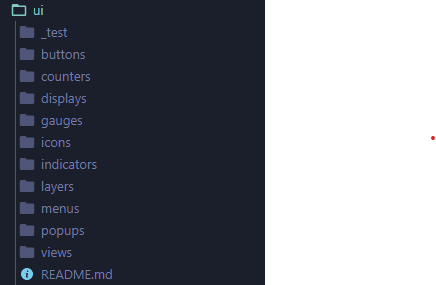
ui
This is both a collection of generalized UI elements that I can build on and the specific implementations of UI elements as shown in my game. Examples of the former include the Sanity gauge and the spell indicator buttons, and an example of the latter is the UI display node which contains the Sanity gauge and each spell indicator being used for the game’s selection of spells.
Given some of the distinctions I’ve made for various game objects, it might seem surprising that I simply lump all the UI elements together. Admittedly, that bothers me a little bit, too, but I haven’t yet thought of a way to cleanly separate the base UI elements and their implementations in a way that makes more sense to me than what I’m doing now. In the meantime, it’s useful for me to know where I store all the UI elements for my game, so they all go here.
Well, not all of them. It’s time now to go back to the other directory I skipped earlier.
core
The core directory, at first glance, looks suspiciously like a microcosm of the project directory, containing directories with names matching the ones I outlined earlier in the article. core is used to contain elements of my code base which I’ve successfully generalized to be reused across any game I make. Therefore, anything housed in core is something which I can safely build specific implementations on top of, without worrying about said things implementing some functionality from a past project.
This is crucial to my approach for making reusable code. Earlier, I mentioned that I make use of Genesis, a boilerplate Godot project. Specifically, the only code that is actually stored in Genesis which gets copied over are the things in this core directory. All the project directories I’ve gone over start out as empty shells, waiting to be filled out with my game-specific implementations that extend from these core systems and files.
What if I need to change how a core system works? In that case, I move the directory/file I need to customize out of core and into its appropriate project-level directory. Why not just modify the things in core directly? It’s out of convention; by enforcing the idea that things in core are never meant to be modified, I can be confident that whatever I build that is on top of a core system or object is something that was designed to work with any project, while something in a project directory, say systems, was designed to specifically work with the current project.
This convention also plays into the scripts I use for managing updating game projects with changes made to the Genesis boilerplate project, such as bug-fixing. Anything in the core directory is something I assume can be straight-up replaced, while anything outside of core needs to receive more manual attention.
That’s All, Folks
That concludes my high-level tour of how I structure my game projects. Again, I’m not saying the way I do things is the best way to organize all game projects; I just wanted to explain how I structure things and the reasons behind those architectural decisions. If you’re looking for ideas on how you should structure your own game projects, I hope my overview helps inspire you to come up with the solutions that work best for you.
Welcome to Part 3 of my tutorial for creating a debugging interface in Godot! In Part 1, we created the base for our debugging system, and in Part 2 we created debug widgets to show our debugging information. If you haven’t read those parts, you would be advised to do so before continuing on with this part. Alternatively, if you want to start from this part, and just need the end code from the preceding parts, you can check out the tutorial-part-2 branch from the Github repo.
At this point, we have a debugging interface that we can toggle on and off, and we have a base DebugWidget class to build our debug widget from, as well as a DebugTextList debug widget. We don’t quite have everything we’d ideally want in a debugging system, though. What happens if we want to display different debug widgets, and not have to see all of them at the same time? What if we have a lot of debug widgets, so much so that they take up most of the screen space, making it impossible to see the underlying game beneath the cluttered visuals?
We could try creating multiple DebugLayer nodes, but this would quickly become brittle and clunky. As the DebugLayer is exposed globally for our code to access, any additional DebugLayer nodes would also need to be global, which would pollute the AutoLoad declarations. It would also mean having to remember which DebugLayer you’re connecting to, as well as assigning different keys to show and hide each layer so that they don’t all show at the same time… Suffice it to say, doing things this way is awful.
It would be better to create a system specifically for showing different debugging interfaces, depending on whatever criteria we choose to specify. We’ll do this by creating a new type of node, the DebugContainer, and modifying DebugLayer to be capable of managing multiple DebugContainer nodes.
If you want to see the final result, you can check out the tutorial-part-3 branch in the Github repo.
Ready? Let’s go!
Creating the DebugContainer
Begin by creating a new script file, DebugContainer.gd, in the _debug directory. Have it extend MarginContainer. We’ll begin by adding this line of code:
# The list of widget keywords associated with the DebugContainer.
var _widget_keywords = {}
Wait a minute, you say. That looks suspiciously like the code we added to DebugLayer.gd in the previous part of this tutorial. Well, you’re right! That’s exactly what it is. Our goal is to move management of individual DebugWidget nodes out of DebugLayer and into DebugContainer nodes, so it makes sense to go ahead and store the widget keywords here.
Moving Widget Code from DebugLayer to DebugContainer
In fact, we’re going to move most of the code we added to DebugLayer for managing debug widgets into DebugContainer.gd. Let’s take care of that right now:
func _ready():
    mouse_filter = MOUSE_FILTER_IGNORE
    _register_debug_widgets(self)
    Debug.register_debug_container(self)


# Adds a widget keyword to the registry.
func _add_widget_keyword(widget_keyword: String, widget_node: Node) -> void:
  var widget_node_name = widget_node.name if 'name' in widget_node else str(widget_node)

  if not _widget_keywords.has(widget_node_name):
    _widget_keywords[widget_node_name] = {}

  if not _widget_keywords[widget_node_name].has(widget_keyword):
    _widget_keywords[widget_node_name][widget_keyword] = widget_node
  else:
    var widget = _widget_keywords[widget_node_name][widget_keyword]
    var widget_name = widget.name if 'name' in widget else str(widget)
    push_error('DebugContainer._add_widget_keyword(): Widget keyword "' + widget_node_name + '.' + widget_keyword + '" already exists (' + widget_name + ')')
    return


# Go through all children of provided node and register any DebugWidgets found.
func _register_debug_widgets(node) -> void:
  for child in node.get_children():
    if child is DebugWidget:
      register_debug_widget(child)
    elif child.get_child_count() > 0:
      _register_debug_widgets(child)


# Register a single DebugWidget to the DebugContainer.
func register_debug_widget(widgetNode) -> void:
  for widget_keyword in widgetNode.get_widget_keywords():
    _add_widget_keyword(widget_keyword, widgetNode)


# Sends data to the widget with widget_name, triggering the callback for widget_keyword.
func update_widget(widget_path: String, data) -> void:
  var split_widget_path = widget_path.split('.')
  if split_widget_path.size() == 1 or split_widget_path.size() > 2:
    push_error('DebugContainer.update_widget(): widget_path formatted incorrectly. ("' + widget_path + '")')

  var widget_name = split_widget_path[0]
  var widget_keyword = split_widget_path[1]

  if _widget_keywords.has(widget_name) and _widget_keywords[widget_name].has(widget_keyword):
    _widget_keywords[widget_name][widget_keyword].handle_callback(widget_keyword, data)
  else:
    push_error('DebugContainer.update_widget(): Widget name and keyword "' + widget_name + '.' + widget_keyword  + '" not found (' + str(_widget_keywords) + ')')
Almost all of the code above is code we worked on in Part 2 of this tutorial. If you need any refreshers on how that code works, feel free to review that part.
There are a couple of differences to the code that need to be pointed out; both are in the _ready() function. First, the mouse_filter = MOUSE_FILTER_IGNORE line.
By default, mouse_filter is equal to MOUSE_FILTER_PASS. That value means that, when you render a UI node, mouse interactions are captured by the first UI element that decides to handle it. If you have two UI nodes, and you click on that stack, the “top” node will receive the mouse event first. If it doesn’t handle the event, it gets passed to any nodes below it. If it does do something with the event, however, then the event is considered to be handled, and is no longer passed on to other nodes.
With that information, let’s think about how our debugging system is implemented. We made DebugLayer a CanvasLayer node that is rendered at the highest level possible. Because of this, anything in DebugLayer will receive mouse events before anything else in the game. Since control nodes default to using the MOUSE_FILTER_PASS setting, that means DebugLayer will consume any mouse events while it is being shown, preventing interaction with the underlying game. That is behavior we definitely don’t want. That is why we set mouse_filter to MOUSE_FILTER_IGNORE for DebugContainer, so that it will ignore any mouse events, allowing them to proceed down to the underlying game nodes.
The other thing to note about the code we’re adding is the call to Debug.register_debug_container(). This will be how our debug container registers itself with the DebugLayer, much like what we did with debug widgets in the previous part of the tutorial.
If you’re copying code over from your project, don’t forget to update the error messaging and code documentation to say DebugContainer instead of DebugLayer.
Modifying DebugLayer to use DebugContainers
We’re going to need to add register_debug_container() to DebugLayer.gd. Before we do so, however, we need to make some other changes to the DebugLayer scene, itself:
Remove the TextList1 node we created in the previous tutorial; we’re no longer going to store debug widgets directly in the DebugLayer scene.
Select the DebugUIContainer node, click on the Layout tab, and select “Full Screen”.
Add a VBoxContainer child to DebugUIContainer.
Add a Tabs node and a MarginContainer node as children of the VBoxContainer (in that order).
Name those last two nodes DebugTabs and DebugContentContainer.
Go to the DebugTabs node properties and set Tab Alignment to left.
That takes care of the scene. Let’s move on to modifying the script. If you haven’t done so already, remove the code implementing debug widgets in DebugLayer (aka the stuff we moved into DebugContainer). Once that’s done, add the register_debug_container() function and the related code that is part of its implementation:
signal debug_container_registered


# The debug containers registered to the DebugLayer.
var _debug_containers = {}

# The currently active debug container.
var _debugContainer: Node

# Nodes implementing the debug container tab switching interface.
onready var debugTabs = $DebugUIContainer/VBoxContainer/DebugTabs
onready var debugContentContainer = $DebugUIContainer/VBoxContainer/DebugContentContainer


func _input(_event) -> void:
  if Input.is_action_just_pressed('toggle_debug_interface'):
    # ...existing code
    _debugContainer.show()


func register_debug_container(containerNode) -> void:
  var container_name = containerNode.name
  if _debug_containers.has(container_name):
    push_error('DebugLayer.register_debug_container: Debug already has registered DebugContainer with name "' + container_name + '".')
    return

  # Reparent the container node to the DebugLayer.
  containerNode.get_parent().call_deferred('remove_child', containerNode)
  debugContentContainer.call_deferred('add_child', containerNode)
  debugTabs.add_tab(container_name)

  _debug_containers[container_name] = containerNode
  if _debug_containers.size() == 1:
    _debugContainer = containerNode

  # Hide this container node so we don't show debug info by default.
  containerNode.hide()

  emit_signal('debug_container_registered', containerNode)
That’s quite a chunk of code. Let’s unpack this and see what everything does.
First, we add a signal, debug_container_registered, which we’ll dispatch whenever a debug container is registered. Next, we add _debug_containers, which will be used the same way that we used _debug_widgets, just for debug containers instead of debug widgets. We also add _debugContainer to keep track of the currently shown debug container’s node.
We define references for two of the UI nodes we added to the DebugLayer scene, debugTabs and debugContentContainer. For now, we’ll ignore these in favor of explaining other parts of the added code. Don’t worry, we’ll explain what these nodes are used for as we progress through the tutorial.
Continuing on, we modify our _input() function to show the current debug container node whenever we toggle on the debug interface. And finally, at long last, we have the register_debug_container() function, itself.
In register_debug_container(), we first get the name of the passed-in containerNode and check to see if that name is already registered; if it is, we show an error and return without doing anything else. Next, we need to reparent the containerNode from wherever it currently is in the scene tree to become a child of debugContentContainer. Note the use of call_deferred(), rather than invoking the functions directly; this calls the specified functions during Godot’s idle time, which prevents issues that can occur when running code within nodes that are being reparented.
We’re going to allow DebugContainer nodes to be added pretty much wherever we want when creating our scenes, so we need to move them inside the DebugLayer at runtime to ensure they get displayed as part of the debugging interface. This should make more sense once we get to the part where we start using debug containers.
After the reparenting is finished, we add a new tab to the DebugTabs node, entitled the debug container’s name. Then we add the containerNode to the dictionary of debug containers; if it’s the first debug container we’ve registered, we set it to be the initially-shown debug container. We want to make sure that our debug containers aren’t visible by default (otherwise, we’ll see every debug container all at once), so we call hide() on the containerNode. Finally, we emit the debug_container_registered signal, so anything that wants to listen for that will know when a debug container is registered, and which one it is.
I have not needed to make use of this signal yet in my personal use of the debugging system, but it seems like a potentially useful thing to expose, so it makes sense to go ahead and do so.
Now that we’ve implemented the register_debug_container() function, it’s time to take a closer look at the DebugTabs node and make it work.
DebugTabs
The Tabs node in Godot is a basic tabs implementation. It does no view switching by itself; instead, when we switch between tabs, a signal is fired indicating which tab was switched to, and it’s up to our code to listen for that signal and respond to it. We’re going to use this functionality to change which debug container is the one being shown in DebugLayer.
Godot does provide a TabsContainer node, which would implement both the tabs and view switching. However, since it is a single node, if you ignore mouse events (as we mentioned needing to add for DebugContainer), then you can’t click on the tabs. If you leave the node able to capture mouse events, it will prevent interacting with the game when the debug interface is open. Thus, I’ve opted to just use the Tabs node and implement view switching manually.
The code to implement the view switching is rather simple:
During _ready(), we connect to the tab_changed signal for debugTabs and provide an _on_Tab_changed() callback. In the callback, we get the name of the tab (based on the tab_index provided as the callback function’s argument), and use that name to find the registered debug container with matching name. We then hide the currently-visible debug container, switch the _debugContainer variable to be the upcoming containerNode, and then make that debug container visible.
Updating Widgets
We’re still missing one important functionality: sending data to update our debug widgets. Since we moved our previous implementation of update_widget() into the DebugContainer node, we’ll need to create a new version of update_widget() that determines which debug container the widget data should be sent to.
# Sends data to the debug container specified in widget_path.
# API: container_name:widget_name.widget_keyword
func update_widget(widget_path: String, data = null) -> void:
  var split_keyword = widget_path.split(':')
  if split_keyword.size() == 1:
    push_error('DebugLayer.update_widget(): No container name was specified. (' + widget_path + ', ' + str(data) + ')')
    return

  var container_name = split_keyword[0]
  if not _debug_containers.has(container_name):
    push_error('DebugLayer.update_widget(): Container with name "' + container_name + '" is not registered.')
    return

  var containerNode = _debug_containers[container_name]
  widget_path = split_keyword[1]
  containerNode.update_widget(widget_path, data)
Notice that the arguments are still the same: we’re passing in a widget_path and data. However, we need a way to indicate which debug container has the debug widget we want to update.
To do this, we’re going to modify the widget_path API slightly. Instead of starting the string with the name of the debug widget, we’ll start with the name of the debug container, and delimit it with a colon, :.
We implement this in code by splitting the widget_path string on said colon and verifying that there was indeed a debug container name passed in. If no container name was provided, then we show an error and return without doing anything further; we do the same if the provided debug container’s name doesn’t exist in our dictionary of registered debug containers. If all is valid, then we get the specified debug container and call its update_widget() function, passing in the other half of our split string (aka the original widget_name.widget_keyword API), as well as data.
At this point, we’re almost ready to run the test scene to try our changes, but there’s something we need to do first: modify our test scene to support the changes we’ve made to our Debug API.
Adding a DebugContainer to the Test Scene
Let’s go straight to our TestScene scene and add one of our new DebugContainer nodes; name it “TestDebugContainer”. As a child of that, add a DebugTextList debug widget with the name “TextList1”. Finally, go to TestScene.gd and change our call to Debug.update_widget() to incorporate our new syntax for specifying the debug container in the widget_path.
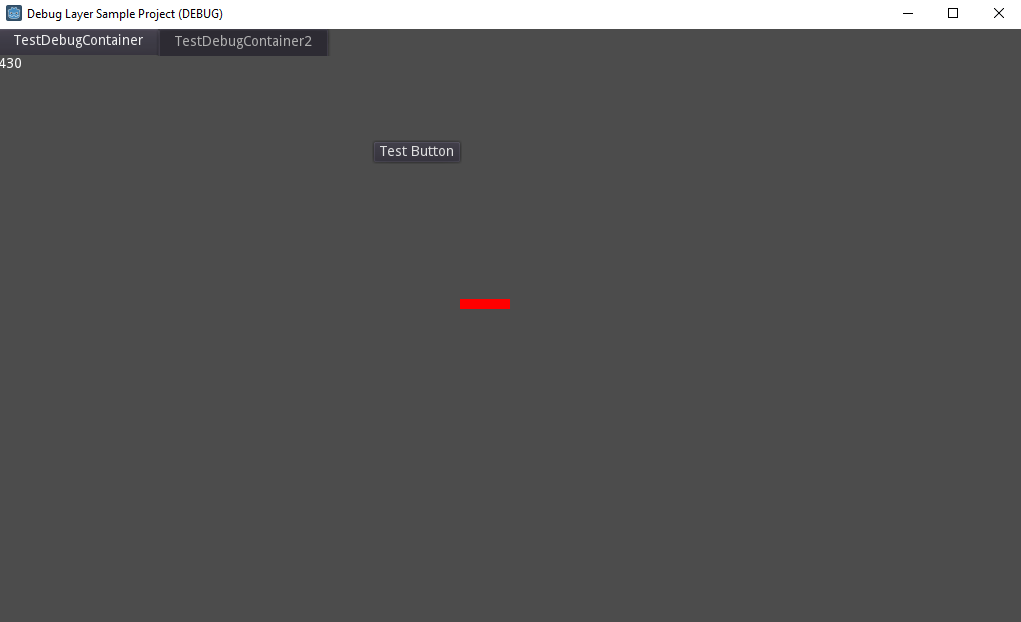
Now we can run the test scene and see our changes in action! If you press the debug toggle key combination we defined earlier (Shift + `), you should be able to see the same counting text that we saw before. Additionally, you should be able to see the tab we just added, titled "TestDebugContainer".
If that's what you see, good job! If not, review the tutorial (and perhaps the repo code) to try and identify where things went wrong.
Testing with Multiple Debug Containers
That said, these are things we've seen before (aside from the tab). We made these changes to support being able to show different debugging views via multiple debug containers. Let's go ahead and add another one!
Duplicate the TestDebugContainer node (which will create a copy of both that node and the child debug widget; the TestDebugContainer node will be automatically named "TestDebugContainer2"), then go to TestScene.gd and add two new calls to Debug.update_widget() as shown below:
As you can see, we're simply changing the widget_path to request TestDebugContainer2 instead of TestDebugContainer. To keep the test simple, our second call is showing the same test_ct variable, but divided by ten and rounded to the nearest integer.
That's it! No, seriously! Go ahead and run the scene again, and everything should "just work". You'll see two tabs, one named "TestDebugContainer" and the other named "TestDebugContainer2". Switching between them will alternate between showing the original counter and the rounded version.
But wait, there's more! We can add these debug containers anywhere in our scene structure, and as long as those scenes are part of the currently-running scene tree they'll register themselves to our debugging interface.
To test this, let's create a quick child scene to add to our test scene. Create a new scene called "TestChild" (based on Node), then add a button with text "Test Button" and place it near the top-center of the child scene. Add a DebugContainer with DebugTextList child to TestChild, and make sure you rename them to "TestDebugContainer2" and "TextList1" (to match the widget_path we've defined in the TestScene.gd script). Instance TestChild into TestScene and remove the TestDebugContainer2 node that was in TestScene.
Run the test scene, and you get exactly the same result as before. You can see both the tabs, and switch between them with ease. The only difference is that one debug container originated in TestScene, and the other in TestChild.
If you see the TestDebugContainer2 tab, but not the counter, that means you forgot to make the debug node names and the widget_key string match, so you're not actually sending updates to the correct location.
Fixing One Last Bug
Before we get too hyped with excitement, however, there is a bug that we need to take care of. Run the test scene, open the debugging interface, and hover over the button we added to the TestChild scene. Nothing seems to happen, right? Now close the debugging interface and hover over the button again. This time, it lights up, indicating that it's receiving mouse events. That means something in our debugging interface is intercepting mouse events.
Fortunately, this is a simple fix: we just need to go to the DebugLayer scene and change the mouse_filter properties for DebugUIContainer, VBoxContainer, and DebugContentContainer to MOUSE_FILTER_IGNORE (shown as just Ignore in the editor interface). Do not, however, change the mouse_filter property for DebugTabs, or you may find yourself unable to click on the tabs at all!
Once you've made those changes, run the test scene again. This time, you should be able to trigger the button hover state when the debug interface is open.
Congratulations!
We now have DebugContainer nodes, which we can add wherever we want, and add whatever debug widgets we want to them, using the tabbed interface to switch between whichever debugging views we want to see. And best of all, it's simple to add these debug containers and widget as we need them, whether for temporarily reporting data or for permanent display of debugging information.
With these things, you have the essentials needed to build on this debugging system and make it your own. Create widgets that show you the information that you need to know. As shown in this tutorial, it's easy to make a new debug widget, and just as easy to register it to the debugging system. Using this system has definitely made my game development much easier, and I hope the same will be true for you!
If you want to see the code as it was at the end of this part, check out the tutorial-part-3 branch in the Github repo.
Welcome to Part 2 of my tutorial for creating a debugging interface in Godot! In Part 1, we created the base for our debugging system. If you haven’t read that part, you should do so now, because the rest of the tutorial series will be building atop it. Alternatively, if you just want the code from the end of Part 1, you can check out the tutorial-part-1 branch in the Github repo.
At this point, we have the base of a debugging system, but that’s all it is: a base. We need to add things to it that will render the debugging information we want to show, as well as an API to DebugLayer that is responsible for communicating this information.
We’ll do this through “debug widgets”. What’s a debug widget? It’s a self-contained node that accepts a set of data, then displays it in a way specific to that individual widget. We’ll make a base DebugWidget node, to provide common functionalities, then make other debug widgets extend that base that implement their custom functionalities on top of the base node.
Alright, enough high-level architecture talk. Let’s dive in and make these changes!
Creating the Base DebugWidget
To get started, we want a place to store our debug widgets. To that end, make a new directory in _debug, called widgets. In this new widgets directory, create a new script called DebugWidget.gd, extending MarginContainer.
# Base class for nodes that are meant to be used with the DebugLayer system.
class_name DebugWidget
extends MarginContainer
Note the custom class_name. This is important, because later on we’ll be using it to check whether a given node is a debug widget.
You may need to reload your Godot project to ensure that the custom class_name gets registered.
Next, we’re going to add something called “widget keywords”:
# Abstract method which must be overridden by the inheriting debug widget.
# Returns the list of widget keywords. Responses to multiple keywords should be provided in _callback.
func get_widget_keywords() -> Array:
  push_error("DebugWidget.get_widget_keywords(): No widget keywords have been defined. Did you override the base DebugWidget.get_widget_keywords() method?")
  return []
This function will be responsible for returning a debug widget’s widget keywords. What are widget keywords, though?
To give a brief explanation, widget keywords are the way we’re going to expose what functionalities this debug widget provides to the debugging system. When we want to send data to a widget, the debugging system will search through a list of stored widget keywords, and if it finds one matching the one we supply in the data-sending function, it will run a callback associated with that widget keyword.
If that doesn’t make much sense right now, don’t worry. As you implement the rest of the flow, it should become clearer what widget keywords do.
One thing to note about the code is that we’re requiring inheriting classes to override the method. This is essentially an implementation of the interface pattern (since GDScript doesn’t provide an official way to do interfaces).
Let’s add a couple more functions to DebugWidget.gd:
# Abstract method which must be overridden by the inheriting debug widget.
# Handles the widget's response when one of its keywords has been invoked.
func _callback(widget_keyword, data) -> void:
  push_error('DebugWidget._callback(): No callback has been defined. (' + widget_keyword + ', ' + data + ')')


# Called by DebugContainer when one of its widget keywords has been invoked.
func handle_callback(widget_keyword: String, data) -> void:
  _callback(widget_keyword, data)
handle_callback() is responsible for calling the _callback() function. Right now, that’s all it does. We’ll eventually also do some pre-callback validation in this function, but we won’t get into that just yet.
_callback() is another method that we explicitly want the inheriting class to extend. Essentially, this is what will be run whenever something uses one of the debug widget’s keywords. Nothing is happening there right now; all the action is going to be in the inheriting debug widgets.
That’s it for the base DebugWidget. Time to extend that base!
Creating the DebugTextList DebugWidget
Remember that DebugLabel that was discussed at the beginning of the article? Having a text label that you can update as needed is a useful thing for a debugging system to have. Why stop with a single label, though? Why not create a debug widget that is a list of labels, which you can update with multiple bits of data?
That’s the debug widget we’re going to create. I call it the DebugTextList.
I prefix debug widget nodes with Debug, to indicate that they are only meant to be used for debugging purposes. It also makes it easy to find them when searching for scenes to instance.
Create a directory in widgets called TextList, then create a DebugTextListscene (not script). If you’ve registered the DebugWidget class, you can extend the scene from that; otherwise, this is the point where you’ll need to reload the project in order to get access to that custom class.
Why create it as a scene, and not as another custom node? Really, it’s simply so that we can create the node tree for our debug widget using the editor’s graphical interface, making it simpler to understand. It’s possible to add the same child nodes through a script, and thereby make it possible to make the DebugTextList a custom node. For this tutorial, however, I’m going to keep using the scene-based way, for simplicity.
Alright, let’s get back on with the tutorial.
Add a VBoxContainer child node to the DebugTextList root node. Afterwards, attach a new script to the DebugTextList scene, naming it DebugTextList.gd, and have it extend DebugWidget. Replace the default script text with the following code:
listNode is a reference to the VBoxContainer. We also have defined a const, WIDGET_KEYWORDS, which will define the widget keywords this debug widget supports. Technically, you could just use the keyword’s strings where needed, rather than define a const, but using the const is easier, as you can see below.
# Handles the widget's response when one of its keywords has been invoked.
func _callback(widget_keyword: String, data) -> void:
  match widget_keyword:
    WIDGET_KEYWORDS.ADD_LABEL:
      add_label(data.name, str(data.value))
    WIDGET_KEYWORDS.REMOVE_LABEL:
      remove_label(data.name)
    _:
      push_error('DebugTextList._callback(): widget_keyword not found. (' + widget_keyword + '", "' + name + '", "' + str(WIDGET_KEYWORDS) + '")')


# Returns the list of widget keywords.
func get_widget_keywords() -> Array:
  return [
    WIDGET_KEYWORDS.ADD_LABEL,
    WIDGET_KEYWORDS.REMOVE_LABEL
  ]
Notice that we’re overriding both _callback() and get_widget_keywords(). The latter returns the two widget keywords we defined in the const, while the former performs a match check against the widget_keyword argument to see if it matches one of our two defined keywords, running a corresponding function if so. By using the const to define our widget keywords, we’ve made it easier to ensure that the same values get used in all the places needed in our code.
match is Godot’s version of implementing the switch/case pattern used in other languages (well, it’s slightly different, but most of the time you can treat it as such). You can read more about it here. The underscore in the match declaration represents the default case, or what happens if widget_keyword doesn’t match our widget keywords.
Let’s go ahead and add the two response functions now: add_label() and remove_label(). We’ll also add a helper function that is used by both, _find_child_by_name().
# Returns a child node named child_name, or null if no child by that name is found.
func _find_child_by_name(child_name: String) -> Node:
  for child in listNode.get_children():
    if 'name' in child and child.name == child_name:
      return child

  return null


# Adds a label to the list, or updates label text if label_name matches an existing label's name.
func add_label(label_name: String, text_content: String) -> void:
  var existingLabel = _find_child_by_name(label_name)
  if existingLabel:
    existingLabel.text = text_content
    return

  var labelNode = Label.new()
  labelNode.name = label_name
  labelNode.text = text_content
  listNode.add_child(labelNode)


func remove_label(label_name) -> void:
  var labelNode = _find_child_by_name(label_name)
  if labelNode:
    listNode.remove_child(labelNode)
_find_child_by_name() takes a given child_name, loops through the children of listNode to see if any share that name, and returns that child if so. Otherwise, it returns null.
add_label() uses that function to see if a label with that name already exists. If the label exists, then it is updated with text_content. If it doesn’t exist, then a new label is created, given the name label_name and text text_content, and added as a child of listNode.
remove_label() looks for an existing child label, and removes it if found.
With this code, we now have a brand-new debug widget to use for our debugging purposes. It’s not quite ready for use to use, yet. We’re going to have to make changes to DebugLayer in order to make use of these debug widgets.
Modifying DebugLayer
Back in Part 1 of this tutorial, we made the DebugLayer scene a global AutoLoad, to make it accessible from any part of our code. Now, we need to add an API to allow game code to send information through DebugLayer to the debug widgets it contains.
Let’s start by adding a dictionary for keywords that DebugLayer will be responsible for keeping track of.
# The list of widget keywords associated with the DebugLayer.
var _widget_keywords = {}
Next, we’ll add in the ability to “register” debug widgets to the DebugLayer.
func _ready():
  # ...existing code
  _register_debug_widgets(self)


# Go through all children of provided node and register any DebugWidgets found.
func _register_debug_widgets(node) -> void:
  for child in node.get_children():
    if child is DebugWidget:
      register_debug_widget(child)
    elif child.get_child_count() > 0:
      _register_debug_widgets(child)


# Register a single DebugWidget to the DebugLayer.
func register_debug_widget(widgetNode) -> void:
  for widget_keyword in widgetNode.get_widget_keywords():
    _add_widget_keyword(widget_keyword, widgetNode)
In our _ready() function, we’ll call _register_debug_widgets() on the DebugLayer root node. _register_debug_widgets() loops through the children of the passed-in node (which, during the ready function execution, is DebugLayer). If any children with the DebugWidget class are found, it’ll call register_debug_widget() to register it. Otherwise, if that child has children, then _register_debug_widgets() is called on that child, so that ultimately all the nodes in DebugLayer will be processed to ensure all debug widgets are found.
register_debug_widget(), meanwhile, is responsible for looping through the debug widget’s keywords (acquired from calling get_widget_keywords()) and adding them to the keywords dictionary via _add_widget_keyword(). Note that this function I chose to not mark as “private” (by leaving off the underscore prefix). There may be reason to allow external code to register a debug widget manually. Though I personally haven’t encountered this scenario yet, the possibility seems plausible enough that I decided to not indicate the function as private.
Let’s add the _add_widget_keyword() function now:
# Adds a widget keyword to the registry.
func _add_widget_keyword(widget_keyword: String, widget_node: Node) -> void:
  var widget_node_name = widget_node.name if 'name' in widget_node else str(widget_node)

  if not _widget_keywords.has(widget_node_name):
    _widget_keywords[widget_node_name] = {}

  if not _widget_keywords[widget_node_name].has(widget_keyword):
    _widget_keywords[widget_node_name][widget_keyword] = widget_node
  else:
    var widget = _widget_keywords[widget_node_name][widget_keyword]
    var widget_name = widget.name if 'name' in widget else str(widget)
    push_error('DebugLayer._add_widget_keyword(): Widget keyword "' + widget_node_name + '.' + widget_keyword + '" already exists (' + widget_name + ')')
    return
That looks like a lot of code, but if you examine it closely, you’ll see that most of that code is just validating that the widget data we’re working with was set up correctly. First, we get the name of widget_node (aka the name as entered in the Godot editor). If that node’s name isn’t already a key in our _widget_keywords dictionary, we add it. Next, we check to see if the widget_keyword already exists in the dictionary. If it doesn’t, then we add it, setting the value equal to the widget node. If it does exist, we push an error to Godot’s error console (after some string construction to make a developer-friendly message).
Interacting with Debug Widgets
At this point, we can register debug widgets so that our debugging system is aware of them, but we still don’t have a means of communicating with the debug widgets. Let’s take care of that now.
# Sends data to the widget with widget_name, triggering the callback for widget_keyword.
func update_widget(widget_path: String, data) -> void:
  var split_widget_path = widget_path.split('.')
  if split_widget_path.size() == 1 or split_widget_path.size() > 2:
    push_error('DebugContainer.update_widget(): widget_path formatted incorrectly. ("' + widget_path + '")')

  var widget_name = split_widget_path[0]
  var widget_keyword = split_widget_path[1]

  if _widget_keywords.has(widget_name) and _widget_keywords[widget_name].has(widget_keyword):
    _widget_keywords[widget_name][widget_keyword].handle_callback(widget_keyword, data)
  else:
    push_error('DebugContainer.update_widget(): Widget name and keyword "' + widget_name + '.' + widget_keyword  + '" not found (' + str(_widget_keywords) + ')')
Our API to interact with debug widgets will work like this: we’ll pass in a widget_path string to update_widget(), split with a . delimiter. The first half of the widget_path string is the name of the widget we want to send data to; the second half is the widget keyword we want to invoke (and thereby tell the widget what code to run).
update_widget() performs string magic on our widget_path, makes sure that we sent in a properly-formatted string and that the widget and widget keyword is part of _widget_keywords. If things were sent correctly, the widget node reference we stored during registration is accessed, and the handle_callback() method called, passing in whatever data the widget node expects. If something’s not done correctly, we alert the developer with error messages and return without invoking anything.
That’s all we need to talk to debug widgets. Let’s make a test to verify that everything works!
Currently, our TestScene scene doesn’t have an attached script. Go ahead and attach one now (calling it TestScene.gd) and add the following code to it:
This is just a simple counter functionality, where test_ct is incremented by 1 each process step. Between 0-899, Debug.update_widget() will be called, targeting a debug widget named “TextList1” and the add_widget widget keyword. For the data we’re passing the widget, we send the name of the label we want to update, and the value to update to (which is a string version of test_ct). Once test_ct hits 900, however, we want to remove the label from the debug widget, which we accomplish through another Debug.update_widget() call to TextList1, but this time using the remove_label widget keyword. Finally, once test_ct hits 1000, we reset it to 0 so it can begin counting up anew.
If you run the test scene right now, though, nothing happens. Why? We haven’t added TextList1 yet! To do that, go to the DebugLayer scene, remove the existing test label (that we created during Part 1), and instance a DebugTextList child, naming it TextList1. Now, if you run the test scene and open up the debugging interface (with Shift + `, which we set up in the previous part), you should be able to see our debug widget, faithfully reporting the value of test_ct each process step.
If that’s what you see, congratulations! If not, review the tutorial code samples and try to figure out what might’ve been missed.
One More Thing
There’s an issue that we’re not going to run into as part of this tutorial series, but that I’ve encountered during my own personal use of this debugging system. To save future pain and misery, we’re going to take care of that now.
Currently, our code for debug widgets always assumes that we’re going to pass in some form of data for it to process. But what if we want a debug widget that doesn’t need additional data? As things stand, because debug widgets assume that there will be data, the code will crash if you don’t pass in any data.
To fix that, we’ll need to add a couple of things to the base DebugWidget class:
# Controls if the widget should allow invocation without data.
export(bool) var allow_null_data = false


# Called by DebugContainer when one of its widget keywords has been invoked.
func handle_callback(widget_keyword: String, data = null) -> void:
  if data == null and not allow_null_data:
    push_error('DebugWidget.handle_callback(): data is null. (' + widget_keyword + ')')
    return

  _callback(widget_keyword, data)
We’ve added an exported property, allow_null_data, defaulting it to false. If a debug widget implementation wants to allow null data, it needs to set this value to true.
handle_callback() has also been modified. Before it runs _callback(), it first checks to see if data is null (which it will be if the second argument isn’t provided, because we changed the argument to default to null). If data is null, and we didn’t allow that, we push an error and return without running callback(). That prevents the game code crashing because of null data, and it also provides helpful information to the developer. If there is data, or the debug widget explicitly wants to allow null data, then we run _callback(), as normal.
That should take care of the null data issue. At this point, we’re golden!
Congratulations!
Our debugging system now supports adding debug widgets, and through extending the base DebugWidget class we can create whatever data displays we want. DebugTextList was the first one we added, and hopefully it should be easy to see how simple it is to add other debug widgets that show our debugging information in whatever ways we want. If we want to show more than one debug widget, no problem, just instance another debug widget!
Even though all this is pretty good, there are some flaws that might not be immediately apparent. For instance, what happens if we want to implement debug widgets that we don’t want to be shown at the same time, such as information about different entities in our game? Or what if we want to keep track of so much debugging information that we clutter the screen, making it that much harder to process what’s going on?
Wouldn’t it be nice if we could have multiple debug scenes that we could switch between at will when the debug interface is active? Maybe we’d call these scenes “containers”. Or, even better, a DebugContainer.
That’s what we’ll be building in the next part of this tutorial!
If you want to see the complete results from this part of the tutorial, check the tutorial-part-2 branch of the Github repo.
At some point during the development of a game, you need to be able to show information that helps you debug issues in your game. What kind of information? That really depends on your game and what your needs are. It could be as simple as printing some text that shows the result of an internal calculation, or it could be as fancy as a chart showing the ratio of decisions being made by the game’s artificial intelligence.
There are different kinds of debugging needed as well. Sometimes, you need something temporary to help you figure out why that function you just wrote isn’t behaving the way you expect it to. Other times, you want an “official” debugging instrument that lives on as a permanent display in your game’s debugging interface.
How does one go about building a debugging system, however? In this blog tutorial, we’ll build a debugging system in the Godot game engine, one that is flexible, yet powerful. It’s useful both for temporary debugging and a long-term debugging solution. I use this system to provide a debugging interface for my own games, and I want to share how to make one like it in the hopes that it helps you in your own game development efforts.
This will be a multiple-part series. At the end of it, you’ll have the root implementation of the debugging system, and knowledge on how to extend it to suit your debugging purposes.
Godot comes with a number of functionalities that are useful for debugging. The most obvious of these is the trusty print() function. Feed it a string, and that string will get printed out to the debugging console during game runtime. Even when you have a debugging system in place, print() is still useful as part of your toolset for temporary debugging solutions. That said, nothing you show with print() is exposed to an in-game interface, so it’s not very useful if you want to show debugging information on a more permanent basis. Also, if you need to see information that updates on every frame step, the debugging console will quickly be overwhelmed with a flood of printed messages, to the point where Godot will bark at you about printing too many messages. Thus, while print() definitely has its uses, we are still in need of something more robust for long-term debugging solutions.
One way I solved this problem in the past is by creating a DebugLabel node, based on a simple Label. This node would listen for a signal, and when said signal was received it would set its text value to whatever string was sent to it. The code looked something like this:
This solution also depended on a separate GlobalMessenger system that functions as a global way of passing information. But that system is a tale for another day.
This gave me a solution for printing debugging information that updated on every process step, without overloading the debugging console. While this little component was useful, it had its drawbacks. Every call to print a message to the DebugLabel would overwrite the previous value, so if I needed to show more than one piece of updating information, I would have to create multiple DebugLabel nodes. It wouldn’t take long for my scenes to be cluttered with DebugLabel nodes. Also, this still wasn’t part of a debugging system. If there was a DebugLabel, it’d show, regardless of whether you needed to view debugging information or not. Thus, while this node also served a valuable purpose, it was not enough for a proper debugging solution.
So what does a debugging solution need? It needs a way to conditionally show and hide debugging information, depending on whether such information needs to be viewed. It also needs to expose a method for game code to interact with it to pass in debugging information. There are many possible kinds of information that we’d want to see, so this interaction method must support being able to accept multiple kinds of information. Finally, there should be an easy way of creating debugging scenes to organize the information in whatever ways make sense to those that view the debugging information.
With that high-level information, let’s start by tackling the first part of that paragraph: conditionally showing and hiding the debugging information.
Creating a Test Scene
But before we start working on the debugging system proper, we should have a test scene that exists to help us test that what we’re creating actually works. It doesn’t need to be anything fancy.
While this part of the tutorial is optional, the tutorial series will be assuming the existence of this test scene. If you choose not to make it, then you’ll have to figure out how to test the debugging system’s code in a different way.
Create a scene, and have it extend Node. Let’s call it “TestScene”. In TestScene, add a Line2D node, make it whatever color you want (I chose red), and set the points to make it some easily-visible size (I set mine to [-25, 0], [25, 0] to make a 50px-long horizontal line). Move the Line2D somewhere near the center of the scene; it doesn’t have to be exact, as long as it isn’t too close to the top or edge of the game window. Finally, click the triangle button to run Godot’s main scene; since we don’t have one defined, Godot will pop up an interface that will allow you to make TestScene the default scene, which you should do.
You can alternatively just run this individual scene without making it the main scene; I have chosen to make it the main scene in this tutorial purely out of convenience.
This is what my version of the test scene looks like after doing these things:
Now that we have a test scene, let’s get to building the debugging system proper.
Creating the DebugLayer Global
We need a way to interact with the debugging interface from anywhere in our game code. The most effective way to do this is to create a global scene that it loaded as part of the AutoLoads. This way, any time our game or a scene in our game is run, the debugging system will always be available.
Start by creating a new scene, called DebugLayer, and have it extend the CanvasLayer node. Once the scene is created, go to the CanvasLayer node properties and set the layer property to 128.
That layer property tells Godot what order it should render CanvasLayer nodes in. The highest value allowed for that property is 128, and since we want debugging information to be rendered atop all other information, that’s what we’ll set our DebugLayer to.
Now, create a script for our node, DebugLayer.gd. For now, we’re not going to add anything to it, we just want the script to be created. Make sure it, as well as the DebugLayer scene, are saved to the directory _debug (which doesn’t exist yet, so you’ll need to create it).
Finally, go to Project -> Project Settings -> AutoLoad, and add the DebugLayerscene (not the DebugLayer.gd script) as an AutoLoad, shortening its name to Debug in the process. This is how we’ll make our debugging interface accessible from all parts of our game.
Yes, you can add scenes to AutoLoad, not just scripts. I actually discovered that thanks to a GDQuest tutorial on their Quest system, and have since used that pattern for a wide variety of purposes, including my debugging system.
To verify that our DebugLayer shows in our game, add a Label child to the DebugLayer scene, then run the game. You should be able to see that Label when you run the game, proving that DebugLayer is being rendered over our TestScene.
Toggle Debug Visibility
This isn’t particularly useful yet, though. We want to control when we show the debugging information. A good way to do this is to designate a key (or combination of keys) that, when pressed, toggles the visibility of DebugLayer and any nodes it contains.
Open up the project settings again, and go to Input Map. In the textbox beside Action:, type “toggle_debug_interface” and press the Add button. Scrolling down to the bottom of the Input Map list will reveal our newly-added action at the bottom.
Now we need to assign some kind of input that will dispatch this toggle_debug_interface action. Clicking the + button will allow you to do this. For this tutorial, I’ve chosen to use Shift + ` as the combination of keys to press (Godot will show ` as QuoteLeft). Once this is done, go ahead and close the project settings window.
It’s time to start adding some code. Let’s go to DebugLayer.gd and add this code:
Right away, the editor will show an error on the visible = boolean line. You can confirm the error is valid by running the project and seeing the game crash on that line, with the error The identifier "visible" isn't declared in the current scope. That’s because CanvasLayer doesn’t inherit from the CanvasItem node, so it doesn’t contain a visible property. Therefore, we’ll need to add a node based on Control that acts as a UI container, and it is this node that we’ll toggle visibility for.
CanvasItem is the node all 2D and Control (aka UI) nodes inherit from.
Add a MarginContainer node to DebugLayer, calling it DebugUIContainer. Then, move the test label we created earlier to be a child of the DebugUIContainer. Finally, in DebugLayer.gd, change the visibility target to our new UI container:
onready var _uiContainer = $DebugUIContainer


func _set_ui_container_visibility(boolean):
  _uiContainer.visible = boolean
You may notice that I’m prefixing _uiContainer with an underscore. This is a generally-accepted Godot best practice for identifying class members that are intended to be private, and thus should not be accessed by code outside of that class. I also use camelCase to indicate that this particular variable represents a node. Both are my personal preferences, based on other best practices I’ve observed, and you do not need to adhere to this style of nomenclature for the code to work.
At this point, if you run the test scene, the test label that we’ve added should no longer be visible (because we’ve defaulted visibility to false). That’s only half the battle, of course; we still need to add the actual visibility toggling functionality. Let’s do so now:
func _input(_event):
  if Input.is_action_just_pressed('toggle_debug_interface'):
    show_debug_interface = !show_debug_interface
    _set_ui_container_visibility(show_debug_interface)
_input() is a function Godot runs whenever it detects an input action being dispatched. We’re using it to check if the input action is our toggle_debug_interface action (run in response to our debug key combination we defined earlier). If it is our toggle_debug_interface action, then we invert the value of show_debug_interface and call _set_ui_container_visibility with the new value.
Technically, we could just call the visibility function with the inverted value, but setting a variable exposes to outside code when the debug interface is being shown. While this tutorial is not going to show external code making use of that, it seems a useful enough functionality that we’re going to include it nonetheless.
Run the test scene again, and press Shift + `. This should now reveal our test label within DebugLayer, and prove that we can toggle the debug interface’s visibility. If that’s what happens, congratulations! If not, review the tutorial to try and identify what your implementation did incorrectly.
Congratulations!
We now have the basics of a debugging interface. Namely, we have a DebugLayer scene that will house our debugging information, one that we can make visible or invisible at the press of a couple of keys.
That said, we still don’t have a way of actually adding debugging information. As outlined earlier, we want to be able to implement debugging displays that we can easily reuse, with a simple API for our game code to send debugging information to the debugging system.
To accomplish these objectives, we’ll create something that I call “debug widgets”. How does a debug widget work? Find out in the next part of this tutorial!
You can review the end state of Part 1 in the Github repo by checking out the tutorial-part-1 branch.
If you’ve worked in Godot long enough, you’ll have encountered the signal pattern. This pattern has one part of the code providing signals that it emits, which other parts of the code can listen for and react to. It’s very useful for keeping the parts of your codebase separated by concern, thereby preventing explicit dependencies, while still allowing for communication between different systems. This pattern is commonly used with UI elements, which have no bearing on how the game systems work, but still need to know when certain events happen. With signals, the UI nodes can listen for when specific game events occur, then take the data from those signals and use it to update their visuals.
In Godot, this pattern is implemented through the use of a Node’s signal keyword, emit_signal and connect methods, and a callback function. Example follows:
# Some example node script
extends Node
signal an_awesome_signal

func an_awesome_function():
  emit_signal('an_awesome_signal', 'data that the listeners receive')

func another_awesome_function():
  connect('an_awesome_signal', self, '_on_An_awesome_signal')

func _on_An_awesome_signal(data):
  print(data) # 'data that the listeners receive'
It is considered good Godot practice to name your listener callbacks after the signal they are responding to, prefixed with _on_ and with the first letter of the signal name capitalized.
Of course, you don’t have to just connect to signals within your node. Any node that is in the same scene as another node can connect to that node’s signals and listen for them. As explained, connecting nodes to one another allows for coding systems that need to respond to certain game events, but without having to call externalNode.external_node_method() each time external_node_method needs to be run in response to something happening.
Godot’s signal implementation is great, but there is a caveat: it doesn’t provide a clean way to listen for nodes which exist outside of the current scene. Let’s go back to the UI example. UI nodes and their code are usually kept separate from game systems code (after all, game systems shouldn’t need to manage the UI), often by creating entire scenes which house a portion of some UI widget, like a health bar. But how does said health bar know when it needs to be updated? Given this health bar (let’s call it HealthBarUI) is separate from the systems which actually calculate an entity’s health, we can’t directly connect it to the health system.
One way to solve this problem is to use relative paths when connecting the signals, e.g. ../../../HealthBarUI. Obviously, this solution is very brittle. If you decide that HealthBarUI needs to be moved anywhere in the node tree, you’ll have to update the signal connection path accordingly. It’s not hard to imagine this becoming untenable when adding many nodes which are connected to other nodes outside of their scene tree; it’s a maintenance nightmare.
A better solution would be to create a global singleton which your nodes can connect to, instead, adding it to the global AutoLoads. This alleviates the burden of relative paths by providing a global singleton variable that is guaranteed to be accessible from every scene.
Many programmers will advise against using the Singleton pattern, as creating so-called “god objects” is an easy way to create messy, disorganized code that makes code reuse more difficult. I share this concern, but advocate that there are certain times where you want to have a global singleton, and I consider this one of them. As with all practices and patterns, use your best judgment when it comes to determining how to apply them to solve your systems design problems.
GDQuest gives a good example of this pattern in this article. Basically, for every signal which needs to be globally connected, you add that signal definition to the global singleton, connect your local nodes to the singleton, and call Singleton.emit_signal() whenever you need to emit the global version of that signal. While this pattern works, it obviously gets more complex with each signal that you need to add. It also creates a hard dependency on the singleton, which makes it harder to reuse your nodes in other places without the global singleton.
I would like to propose a different take on the global singleton solution. Instead of explicitly defining global signals inside of a globally-accessible singleton file, we can dynamically add signals and connectors to a GlobalSignal node through add_emitter and add_listener methods. Once a signal is registered, then whenever it is emitted by its node, any registered listeners of that signal will receive it and be able to respond to it, exactly the same as how signals normally work. We avoid a hard dependency on the GlobalSignal singleton because we’re just emitting signals the normal way. It’s a clean solution that takes advantage of how Godot’s signals work as much as possible.
Also, this post was originally written for Godot 3.x. With Godot 4.0 being (finally) released, I did a quick conversion of the sample project to 4.0 and pushed it up in a separate branch. I won’t update the article with 4.0 versions of code at this time, but there aren’t too many changes, so it shouldn’t be too hard to follow and translate the differences.
Building the Basics
Let’s start by creating the file (I’m assuming you’ll have created a Godot project to work with, first). I’ve called it global_signal.gd. It should extend the basic Node. Once the file is created, we should add it to the global AutoLoads by going into Godot’s project settings, clicking the AutoLoad tab, then adding our script (with the variable name GlobalSignal).
This is how we will make GlobalSignal accessible from any scene’s code. Godot automatically loads any scripts in the AutoLoad section first and places them at the top of the game’s node hierarchy, where they can be accessed by their name.
With that out of the way, let’s start adding code to global_signal.gd. First, we need a way for GlobalSignal to know when a node has a signal that can be emitted globally. Let’s call these nodes emitters. This code should take care of adding emitters for GlobalSignal to keep track of:
# Keeps track of what signal emitters have been registered.
var _emitters = {}


# Register a signal with GlobalSignal, making it accessible to global listeners.
func add_emitter(signal_name: String, emitter: Object) -> void:
  var emitter_data = { 'object': emitter, 'object_id': emitter.get_instance_id() }
  if not _emitters.has(signal_name):
    _emitters[signal_name] = {}
  _emitters[signal_name][emitter.get_instance_id()] = emitter_data
Nothing too complex about this. We create a dictionary to store data for the emitter being added, check to see if we have an existing place to store signals with this name (and create a new dictionary to house them if not), then add it to the _emitters dictionary, storing it by signal name and instance id (the latter being a guaranteed unique key that is already part of the node, something we’ll be taking advantage of later).
We can now register emitters, but we also need a way to register listener nodes. After all, what’s the point of having a global signal if nothing can respond to it? The code for adding listeners is nearly identical to the code for adding emitters; we’re just storing things in a _listeners variable instead of _emitters.
# Keeps track of what listeners have been registered.
var _listeners = {}

# Adds a new global listener.
func add_listener(signal_name: String, listener: Object, method: String) -> void:
  var listener_data = { 'object': listener, 'object_id': listener.get_instance_id(), 'method': method }
  if not _listeners.has(signal_name):
    _listeners[signal_name] = {}
  _listeners[signal_name][listener.get_instance_id()] = listener_data
With that, we now have the ability to add emitters and listeners. What we don’t yet possess is a way to connect these emitters and listeners together. Normally, when using signals, we’d have the listener node connect() to the emitter node, specifying whatever signal it wants to connect to and the callback function which should be invoked (as well as the node where this callback function resides). We need to replicate this functionality here, but how do we ensure that a new emitter gets connected to all current and future listeners, and vice versa?
Simply put, every time we add a new emitter, we need to loop through GlobalSignal‘s listeners, find the ones which want to connect with that emitter’s signal, and perform the connection. The same is true for when we add a new listener: when a new listener is added, we need to loop through the registered emitters, find the ones whose signal matches the one the listener wants to listen to, and perform the connection. To abstract this process, let’s create a couple of functions to take care of this for us.
# Connect an emitter to existing listeners of its signal.
func _connect_emitter_to_listeners(signal_name: String, emitter: Object) -> void:
  var listeners = _listeners[signal_name]
  for listener in listeners.values():
    emitter.connect(signal_name, listener.object, listener.method)


# Connect a listener to emitters who emit the signal it's listening for.
func _connect_listener_to_emitters(signal_name: String, listener: Object, method: String) -> void:
  var emitters = _emitters[signal_name]
  for emitter in emitters.values():
    emitter.object.connect(signal_name, listener, method)
Now we need to modify our existing add functions to run these connector functions.
We first check to make sure an emitter/listener has already been defined before we try to connect to it. Godot doesn’t like it when you try to run code on objects that don’t exist. 😛
With that, the last thing we need to finish the basic implementation is to add a way for removing emitters and listeners when they no longer need to be connected. We can implement such functionality thusly:
# Remove registered emitter and disconnect any listeners connected to it.
func remove_emitter(signal_name: String, emitter: Object) -> void:
  if not _emitters.has(signal_name): return
  if not _emitters[signal_name].has(emitter.get_instance_id()): return

  _emitters[signal_name].erase(emitter.get_instance_id())

  if _listeners.has(signal_name):
    for listener in _listeners[signal_name].values():
      if emitter.is_connected(signal_name, listener.object, listener.method):
        emitter.disconnect(signal_name, listener.object, listener.method)


# Remove registered listener and disconnect it from any emitters it was listening to.
func remove_listener(signal_name: String, listener: Object, method: String) -> void:
  if not _listeners.has(signal_name): return
  if not _listeners[signal_name].has(listener.get_instance_id()): return

  _listeners[signal_name].erase(listener.get_instance_id())

  if _emitters.has(signal_name):
    for emitter in _emitters[signal_name].values():
      if emitter.object.is_connected(signal_name, listener, method):
        emitter.object.disconnect(signal_name, listener, method)
As with the add functions, the remove functions are both almost identical. We take an emitter (or listener), verify that it exists in our stored collection, and erase it from the collection. After that, we check to see if anything was connected to the thing being removed, and if so we go through all such connections and remove them.
That’s it for the basic implementation! We now have a functional GlobalSignal singleton that we can use to connect emitters and listeners dynamically, whenever we need to.
A Simple Test
Let’s create a simple test to verify that all this is working as intended.
First, create a Node-based scene in your project. Then, add a LineEdit node and a Label node (along with whatever other Control nodes you want to add to make it appear the way you want), and create the following scripts to attach to them:
You could also use the value argument for _on_Text_changed, instead of taking the direct value of text. It’s a matter of preference.
Assuming you’ve implemented the code from this tutorial correctly, when you run the scene, you should be able to type in the LineEdit node and see the values of the Label node update automatically. If it’s working, congratulations! If not, go back and look through the code samples to see what you might’ve missed, or download the sample project to compare it with yours.
Now, obviously, this is a contrived example. GlobalSignal would be overkill for solving such a simple scenario as the one presented in the test case. Hopefully, though, it illustrates how this approach would be useful for more complex scenarios, such as the HealthBarUI example described earlier. By making our global signal definition dynamic, we avoid having to make updates to GlobalSignal every time we need to add a new globally-accessible signal. We emit signals from the nodes, as you do normally; we just added a way for that signal to be listened to by nodes outside of the node’s scene tree. It’s powerful, flexible, and clean.
Resolving Edge Cases and Bugs
There are some hidden issues that we need to address, however. Let’s take a look at them and see how we can fix them.
Dealing with Destroyed Nodes
Let’s ask ourselves a hypothetical question: what would happen if a registered emitter or listener is destroyed? Say the node is freed by the parent (or the parent itself is freed). Would GlobalSignal know this node no longer exists? The answer is no, it wouldn’t. Subsequently, what would happen if we’re looping through our registered emitters/listeners and we try to access the destroyed node? Godot gets unhappy with us, and crashes.
How do we fix this? There are two approaches we could take:
We could poll our dictionaries of registered emitters and listeners every so often (say, once a second) to check and see if there’s any dead nodes, and remove any we find.
Alternatively, we could run that same check and destroy whenever we make a call to a function which needs to loop through the lists of emitters and listeners.
Of those two options, I prefer the latter. By only running the check when we explicitly need to loop through our emitters and listeners, we avoid needlessly running the check and thereby introducing additional processing time when we don’t know that it’s necessary (which is what would happen if we went with polling). Thus, we’re going to implement this only-when-necessary check in the four places that need it: namely, whenever we add or remove an emitter or listener.
There is an argument to be made that running the check as part of adding/removing emitters/listeners adds additional processing time when performing these functions. That’s true, but in practice I’ve found that the added time isn’t noticeable. That said, if your game is constantly creating and destroying nodes that need to be globally listened to, and it’s measurably impacting game performance, it may prove better to implement a poll-based solution. I’m just not going to do it as part of this tutorial.
First, let’s create a function that will both perform the check and remove the emitter/listener if it is determined it no longer exists.
# Checks stored listener or emitter data to see if it should be removed from its group, and purges if so.
# Returns true if the listener or emitter was purged, and false if it wasn't.
func _process_purge(data: Dictionary, group: Dictionary) -> bool:
  var object_exists = !!weakref(data.object).get_ref() and is_instance_valid(data.object)

  if !object_exists or data.object.get_instance_id() != data.object_id:
    group.erase(data.object_id)
    return true
  return false
First, we check all the possible ways that indicate that a node (or object, which is what a node is based on) no longer exists. weakref() checks to see if the object only exists by reference (aka has been destroyed and is pending removal from memory), and is_instance_valid is a built in Godot method that returns whether Godot thinks the instance no longer exists. I’ve found that I’ve needed both checks to verify whether or not the object truly exists.
You may want to abstract this object existence check into some kind of helper function that is made globally accessible. This is what I’ve done in my own implementation of GlobalSignal, but I chose to include it directly in this tutorial to avoid having to create another file exclusively to house that helper.
Even if we prove the object exists, we still need to check to make sure the stored instance id for the emitter/listener matches the current instance id of said object. If they don’t match, then it means the stored object is no longer the same as the one we registered (aka the reference to it changed).
If the object doesn’t exist, or if it’s not the same object as the one we registered, then we need to remove it from our dictionary. group is the collection we passed in for validation (this will be explained in more detail momentarily), and group.erase(data.object_id) deletes whatever value is stored at the key with the same name as data.object_id. If we’ve reached this point, we then return true. If we didn’t erase the object, we return false.
With our purge function defined, let’s go ahead and modify our add and remove functions to implement it:
func _connect_emitter_to_listeners(signal_name: String, emitter: Object) -> void:
  var listeners = _listeners[signal_name]
  for listener in listeners.values():
    if _process_purge(listener, listeners):
      continue
    emitter.connect(signal_name, listener.object, listener.method)


func _connect_listener_to_emitters(signal_name: String, listener: Object, method: String) -> void:
  var emitters = _emitters[signal_name]
  for emitter in emitters.values():
    if _process_purge(emitter, emitters):
      continue
    emitter.object.connect(signal_name, listener, method)


func remove_emitter(signal_name: String, emitter: Object) -> void:
  # ...existing code

  if _listeners.has(signal_name):
    for listener in _listeners[signal_name].values():
      if _process_purge(listener, _listeners[signal_name]):
        continue
      if emitter.is_connected(signal_name, listener.object, listener.method):
        emitter.disconnect(signal_name, listener.object, listener.method)


func remove_listener(signal_name: String, listener: Object, method: String) -> void:
  # ...existing code

  if _emitters.has(signal_name):
    for emitter in _emitters[signal_name].values():
      if _process_purge(emitter, _emitters[signal_name]):
        continue
      if emitter.object.is_connected(signal_name, listener, method):
        emitter.object.disconnect(signal_name, listener, method)
For each function, the only thing we’ve changed is adding the _process_purge() check before doing anything else with the emitters/listeners. Let’s examine what’s happening in _connect_emitter_to_listeners(), to detail the logic.
As we start looping through our dictionary of listeners (grouped by signal_name), we first call _process_purge(listener, listeners) in an if statement. From examining the code, listener is the current listener node (aka the object we want to verify exists) and listeners is the group of listeners for a particular signal_name. If _process_purge() returns true, that means the listener did not exist, so we continue to move on to the next stored listener. If _process_purge() returns false, then the listener does exist, and we can proceed with connecting the emitter to the listener.
The same thing happens for the other three functions, just with different values passed into _process_purge(), so I shan’t dissect them further. Hopefully, the examination of what happens in _connect_emitter_to_listeners() should make it clear how things work.
That’s one issue down. Let’s move on to the last issue that needs to be addressed before we can declare GlobalSignal complete.
Accessing an Emitter/Listener Before It’s Ready
Here’s another scenario to consider: what happens if we want to emit a globally-accessible signal during the _ready() call? You can try this out yourself by adding this line of code to TestLineEdit.gd, right after defining the global signal:
GlobalSignal.add_emitter('text_updated', self)
emit_signal('text_updated', 'text in _ready()')
We’d expect that, on starting our scene, our Label node should have the text set to “text in _ready()”. In practice, however, nothing happens. Why, though? We’ve established that we can use GlobalSignal to listen for nodes, so why doesn’t the connection in Label seem to be working?
To answer this question, let’s talk a little about Godot’s initialization process. When a scene is added to a scene tree (whether that be the root scene tree or a parent’s scene tree), the _ready() function is called on the lowermost child nodes, followed by the _ready() functions of the parents of those children, and so on and so forth. For sibling children (aka child nodes sharing the same parent), Godot calls them in tree order; in other words, Child 1 runs before Child 2. In our scene tree composition for the sample project, the LineEdit node comes before the Label node, which means the _ready() function in LineEdit runs first. Since Label is registering the global listener in its _ready() function, and that function is running after LineEdit‘s _ready() function, our text_updated signal gets emitted before the listener in Label is registered. In other words, the signal is being emitted too early.
How do we fix this? In our contrived example, we could move the Label to appear before the LineEdit, but then that changes where the two nodes are being rendered. Besides, basing things on _ready() order isn’t ideal. In the case where we want nodes in different scenes to listen for their signals, we can hardly keep track of when those nodes run their _ready() function, at least not without some complex mapping of your scene hierarchy that is painful to maintain.
The best to solve this problem is to provide some way to guarantee that, when emit_signal is called, that both the emitter and any listeners of it are ready to go. We’ll do this by adding a function called emit_signal_when_ready() which we call whenever we need to emit a signal and guarantee that any listeners for it that have been defined in _ready() functions are registered.
Unfortunately, we can’t override the existing emit_signal function itself to do this, because emit_signal uses variadic arguments (aka the ability to define any number of arguments to the function), which is something Godot does not allow for user-created functions. Therefore, we need to create a separate function for this.
We’ll need to add more than just the emit_signal_when_ready() function itself to make this functionality work, so I’ll go ahead and show all of the code which needs to be added, and then cover what’s going on in detail.
# Queue used for signals emitted with emit_signal_when_ready.
var _emit_queue = []

# Is false until after _ready() has been run.
var _gs_ready = false


# We only run this once, to process the _emit_queue. We disable processing afterwards.
func _process(_delta):
  if not _gs_ready:
    _make_ready()
    set_process(false)
    set_physics_process(false)


# Execute the ready process and initiate processing the emit queue.
func _make_ready() -> void:
  _gs_ready = true
  _process_emit_queue()


# Emits any queued signal emissions, then clears the emit queue.
func _process_emit_queue() -> void:
  for emitted_signal in _emit_queue:
    emitted_signal.args.push_front(emitted_signal.signal_name)
    emitted_signal.emitter.callv('emit_signal', emitted_signal.args)
  _emit_queue = []


# A variant of emit_signal that defers emitting the signal until the first physics process step.
# Useful when you want to emit a global signal during a _ready function and guarantee the emitter and listener are ready.
func emit_signal_when_ready(signal_name: String, args: Array, emitter: Object) -> void:
  if not _emitters.has(signal_name):
    push_error('GlobalSignal.emit_signal_when_ready: Signal is not registered with GlobalSignal (' + signal_name + ').')
    return

  if not _gs_ready:
    _emit_queue.push_back({ 'signal_name': signal_name, 'args': args, 'emitter': emitter })
  else:
    # GlobalSignal is ready, so just call emit_signal with the provided args.
    args.push_front(signal_name)
    emitter.callv('emit_signal', args)
That’s quite a lot to take in, so let’s break it down, starting with the two class members being added, _emit_queue and _gs_ready.
_emit_queue is a simple array that we’re going to use to keep track of any signals that have been marked as needing to be emitted when GlobalSignal decides everything is ready to go. _gs_ready is a variable that will be used to communicate when GlobalSignal considers everything ready.
I use _gs_ready instead of _ready to avoid giving a variable the same name as a class function. While I’ve found that Godot does allow you to do that, I consider it bad practice to have variables with the same name as functions; it’s confusing, and confusing code is hard to understand.
Next, let’s examine our call to _process() (a built-in Godot process that runs on every frame update):
# We only run this once, to process the _emit_queue. We disable processing afterwards.
func _process(_delta):
  if not _gs_ready:
    _make_ready()
    set_process(false)
    set_physics_process(false)
If _gs_ready is false (which is what we’ve defaulted it to), then we call _make_ready() and subsequently disable the process and physics process update steps. Since GlobalSignal doesn’t need to be run on updates, we can save processing time by disabling them once we’ve run _process() the first time. Additionally, since GlobalSignal is an AutoLoad, this _process() will be run shortly after the entire scene tree is loaded and ready to go.
Let’s check out what _make_ready() does:
# Execute the ready process and initiate processing the emit queue.
func _make_ready() -> void:
  _gs_ready = true
  _process_emit_queue()
The function sets _gs_ready to true, then calls _process_emit_queue(). By marking _gs_ready as true, it signals that GlobalSignal now considers things to be ready to go.
Moving on to _process_emit_queue():
# Emits any queued signal emissions, then clears the emit queue.
func _process_emit_queue() -> void:
  for emitted_signal in _emit_queue:
    emitted_signal.args.push_front(emitted_signal.signal_name)
    emitted_signal.emitter.callv('emit_signal', emitted_signal.args)
  _emit_queue = []
Here, we loop through the _emit_queue array, push the signal name to the front of the arguments array, and use callv to manually call the emit_signal() function on the emitter node, passing in the array of arguments (emit_signal() takes the signal’s name as the first argument, which is why we needed to make the signal name the first member of the arguments array) . When we’ve gone through all of the members of _emit_queue, we reset it to an empty array.
Finally, we come to the emit_signal_when_ready() function, itself:
# A variant of emit_signal that defers emitting the signal until the first process step.
# Useful when you want to emit a global signal during a _ready function and guarantee the emitter and listener are ready.
func emit_signal_when_ready(signal_name: String, args: Array, emitter: Object) -> void:
  if not _emitters.has(signal_name):
    push_error('GlobalSignal.emit_signal_when_ready: Signal is not registered with GlobalSignal (' + signal_name + ').')
    return

  if not _gs_ready:
    _emit_queue.push_back({ 'signal_name': signal_name, 'args': args, 'emitter': emitter })
  else:
    # GlobalSignal is ready, so just call emit_signal with the provided args.
    args.push_front(signal_name)
    emitter.callv('emit_signal', args)
First, we check to see if the signal we want to emit has been registered with GlobalSignal, and return early if it is not (with an error pushed to Godot’s console to tell us this scenario happened). Our next action depends on the value of _gs_ready. If it’s false (aka we aren’t ready), then we add a new entry to _emit_queue and pass in the signal name, arguments, and emitter node, all of which will be utilized during _process_emit_queue(). If it’s true, then we called this function after everything has been marked as ready; in that case, there’s no point in adding this to the emit queue, so we’ll just invoke emit_signal() and call it a day.
With that, GlobalSignal should now be able to handle dispatching signals and guaranteeing that the listeners defined during _ready() functions are registered. Let’s test this by changing our modification to TestLineEdit so it uses emit_signal_when_ready():
GlobalSignal.add_emitter('text_updated', self)
GlobalSignal.emit_signal_when_ready('text_updated', ['text in _ready()'], self)
Note that we need to convert our ‘text in _ready()’ argument to be wrapped in an array, since we need to pass an array of arguments to the function.
Also note that we have to pass in the emitter node, since we have to store that in order to call emit_signal() on it later.
If, when you run the scene, the Label node shows our text string, that means our changes worked! Now we can declare GlobalSignal done!
Using Global Signals
Congratulations! You now have a dynamic way to define globally-accessible signals that closely follows Godot’s natural signals implementation. Adding new global signals is easy, and doesn’t involve changing the GlobalSignal singleton at all.
At this point, you might wonder, “Why not convert all of my signals to be global signals?” That’s not necessarily a great idea. Most of the time, we want to keep our signals local, as when we start connecting code from disparate parts of our code base it can make it confusing to recall which things are connected to what. By keeping signals local whenever possible, we make dependencies clearer and make it harder to design bad code.
That’s one of the things I actually like about this approach to implementing global signals. We’re still emitting signals locally; we just choose which signals need to also be exposed globally. You can connect signals locally and globally, with the same signal definitions.
What are some good use cases? UI nodes, as mentioned before, are a great example of a good use case for this pattern. An achievements system needing to know when certain events occur is another possible use case. Generally, this pattern is best suited for when you have multiple “major” systems that need to talk to one another in an agnostic manner, while local signal connections are better for communication between the individual parts of a major system.
As with any pattern or best practice, GlobalSignal should be carefully considered as one of many solutions to your problem, and chosen if it proves to be the best fit.
One last time, here is the link to the sample project, if you didn’t build along with the tutorial, or just want something to compare your implementation against. (And if you are using Godot 4.0, here is the branch with that version of it!)
Hopefully, this approach to global signals helps you in your projects. I’ve certainly made great use of it in mine!
Outside my home office window, fluffy flakes of snow drifted down from the night sky, coating the ground in white, hiding the dreary brownish grass. It was a picturesque scene, and I allowed myself a brief moment to enjoy it; but then my focus turned back to the task before me: crafting the finishing touches of a sample game UI. A last practice project, in preparation for the challenging journey I was about to undertake.
In less than an hour, Ludum Dare 43 — a video game competition wherein participants design, develop, and deploy a video game in 72 hours — would begin, and I wanted to be sure my mind was primed and ready to roll the moment the competition began.
Before you continue further, dear reader, let me forewarn you: this is no mere post, simply detailing the development of a video game. This is a tale of hopes and dreams, of fear and despair; a tale of lessons learned, best laid plans, and desperate decisions; perhaps most of all, it is a tale of one man’s journey to stare dread fate in the eye and dare to succeed.
This, then, is the tale of my experience creating Sanity Wars for Ludum Dare 43, in all its horror and glory. Sit down, buckle up, and hold on.
The Beginning
I’d reserved today — November 30th, a Friday — and the following Monday and Tuesday off on PTO, in preparation for this weekend competition. I’d spent nearly a year teaching myself how to create video games, and now was when I felt my skills were sufficiently advanced enough to tackle a real challenge: Ludum Dare, a legendary video game competition where participants are given 72 hours to create a brand-new video game.
Though unconventional, I planned to enter the contest with a custom JavaScript-based engine that I coded myself, from its humble beginnings as a tutorial engine to its current state, with my unique experiments and needs added to it. It was general enough that I felt comfortable putting it to the test in the fires of competition.
This was an important moment for me. One of my dreams has been to create and release a professional video game, and to me this contest felt like the perfect opportunity to test not only my skill, but also my resolve. How would it feel to channel my creative and intellectual effort into making a video game? Would I enjoy the process enough to commit to wanting to make a full-fledged game later on down the road? Could I make a game that people would enjoy playing? Over the next three days, I reckoned, I’d find out the answers to these questions.
Let the Games Begin! (Friday Night)
At 8 p.m. CDT, the theme for Ludum Dare 43, voted on by its participants, was revealed: “Sacrifices Must Be Made”. I was pleased; this was one of the options I’d been voting for. As a creator, I’ve always been partial to the thematic and narrative drama sacrifice offers, and I knew I’d be able to come up with something that would fit this theme.
Pacing back and forth in my home office to get my creative juices flowing, I hashed through various different possibilities. Eventually, I settled on a general idea for the signature game mechanic: a side-scrolling platformer where the player used a resource called “sanity” to cast spells — but their sanity was also their health bar, and casting too many spells would deplete their sanity below zero, causing the player to die.
Additionally, players would not be able to access these spells at the start of the game; they’d instead start with something called a “sanity buff” which increased sanity recharge rate. If the player chose to sacrifice these buffs, they’d gain access to spells, but also decrease the rate at which their sanity recharged.
The narrative theme I created to support this mechanic was that the player would be fighting a malevolent being named the Dread Overlord, who held the entire world under the sway of terror, and that the player’s narrative goal would be to weaken the Dread Overlord’s iron grip, bringing salvation to the world. In this, the game also served as a loose allegory to the struggle with bipolar disorder, a struggle I am intimately familiar with, and that further endeared me to the idea. It was, I felt, a perfect fit with the sacrificial nature of the theme, as well as the sanity-casting and buff-sacrificing mechanics.
Little did I know of the irony this narrative theme would present later on in the competition.
With my initial planning made, I sat at my desk and immediately began prototyping my sanity-casting mechanic. It so happened that I already had a spell-casting mechanic built from a previous experiment. Using this as a base, I managed to hammer out a working prototype of the mechanic by early morning. The player’s hit points, or HP, would be directly tied to their mana — or, as I was calling it, “sanity”. Spells could not be accessed until their hotkey was held down for a long-enough period of time — aka a “sacrificed” sanity buff. Reducing sanity to below 0 would trigger the player death state, though I had yet to code what that actually looked like.
I also came up with a tentative title for the game: “Sanity Wars”. It wasn’t a perfect title, but I’d spent half an hour brainstorming possible titles, and this was the one that felt the least cheesy. I figured I’d revisit it later and come up with something better, near the end of the competition.
Feeling satisfied with the current state of things, I decided to call it a night and get some sleep. My confidence at this point felt solid; I believed that I had enough time to take this vision I’d come up with and hammer it out. Soon, I was fast asleep.
Time Management Issues (Saturday)
Around 8-9 a.m. CST, I woke up to a breakfast prepared by my wonderful, amazing wife, and I enjoyed the family meal before returning to the office to begin the day’s work on my game. The first thing I did was to finish implementing player death, which didn’t take much time. I just tied the player HP stat to mirror the sanity level.
Now that I felt I had the “core” of the game implemented, I thought about what to tackle next. I’d noticed the tileset I’d been working with included sloped tiles, but my engine didn’t have support for moving on a sloped tile. So…why not knock that out real quick?
Three hours later, I had a very buggy implementation of slopes; try as I might, I simply could not get the physics of walking on the slope to work correctly. At that point, I finally asked myself the question that I should have asked myself before I started working on slopes: Is this a feature I really need in my game?
The answer was glaringly obvious: No, it did not. I had been developing just fine with block tiles and jumping around, and while I loved the idea of including slopes, they were far from essential for my game to work. Thus…I nixed the idea and moved on. Three hours, down the drain, over a needless feature…
Lesson Learned: Question whether the feature you’re planning to add is necessary before writing code for it.
I decided my next goal should be to implement an enemy. Hitherto, all I had was a player and the sanity mechanic for casting spells. There needed to be at least one enemy, ideally more, for the player to contend with.
I decided I wanted to create a flying enemy, to avoid having to deal with determining where a ground character could move. After perusing OpenGameArt.com for a considerable period of time, I found a floating eyeball animation that looked delightfully menacing. With that as my art base, I created a floating eyeball entity, which would fly at the player, then back away to a random distance once they got too close, then either wander around for a bit or immediately descend upon the player again. When they were close enough to the player, they would trigger a sanity drain, thus “attacking” the player. It took another few hours, but it was complete and I had it integrated into Tiled (the tilemap editor I was using), so I could place floating eyeballs anywhere I wanted.
By then, the hour was getting late. I took a short break, to ponder my next moves. That was when it finally dawned on me: I had a mechanic, I had a player, I had an enemy…but I had no core game loop. In other words, I had no goal for the player to attain, no objectives to attain along the way. All I had was a map with a sanity caster and a few floating eyeballs. That wasn’t a game, that was a setup.
What was the player’s goal? In order for my game to truly be a game, I needed to answer that question, fast, and then implement the bare minimum necessary to make that goal playable.
Lesson Learned: Hash out the core loop for the game right away. Maybe it will change later, but at least have an initial iteration.
After some brainstorming — I can’t recall exactly how long — I settled on the idea that the player needed to survive and find a Final Exit, but this wouldn’t be considered a true victory unless the player first found some Objective; both the Final Exit and the Objective would be randomly spawned in one of a series of maps. Each map would be connected linearly by portals. I felt these things should all be doable within a day or less, and now that it was past 1 a.m. of the next morning I decided to go to bed now. Hopefully, this would give me the energy needed to bang things out quickly.
Making the World (Sunday)
The next morning, I woke up, scarfed down a quick breakfast, then headed back into my home office to start implementing the Map Portals mechanic. Up until now, I had been working with isolated test maps. In theory, I should be able to write code which would create two portals on a map, each linking to a different map, as determined by the load order in my map configuration file.
I spontaneously decided that I wanted the player to be spawned randomly as well, and that furthermore I wanted the player to spawn only in a map corner. Thinking that this shouldn’t be too hard, I got to work designing and implementing the code that would let me do this.
It took more work than I thought it would. I not only needed to restrict where on the start map a player could spawn, I also needed to check and make sure the spawn location was actually habitable by the player (in other words, not inside a solid tile, like a wall) and directly above a ground area (so the player wouldn’t spawn at the top of a tall map in mid-air). After several hours, I had the mechanic working, and proceeded to work on the Map Portals.
A lot of the spawning logic I used for the player also applied to spawning Map Portals, so I made use of copy-pasta and removed the map corner restriction. I then needed to add logic to prevent map portals from spawning on top of each other (or the player), as well as logic to prevent portals from spawning too close to each other.
Another several hours later, I had the portal spawns complete. Now, for the challenging part: enabling the player to press a key in front of one of these portals, and be teleported to the correct corresponding portal on the linked map.
It turned out to be even more complicated than I expected. First, I had to set up a system by which two portal objects could be “linked” together so that they’d always send the player to the correct location. Then I had to load the next map’s data into the game while swapping out the old map data (but not deleting it, because I’d need to restore it when the player returned to that map). The player also needed to be teleported to the receiving portal’s coordinates, which involved resetting the camera to focus immediately on the receiving portal’s location and preventing the player from accidentally teleporting back to their original location by holding the action key a fraction of a second too long. There also needed to be logic to determine where the Final Exit would be spawned, and only render the object when the player was on the chosen map. Finally, any additional entities (enemies, the Objective) on one map needed to be removed from the game loop, then put back in when the player returned to that map.
In short, I needed to make maps containing bad guys, portals, tomes, and the exit.
I spent the entire rest of the day just implementing all this logic. Along the way, I decided, instead of a single Objective, to create multiple Objective pickups (which I ultimately decided to call Tomes, giving them a bookish sprite), spawning one on each map, and that the player had to collect all of them to get the “best” ending; anything less would result in achieving a subpar ending. I also wound up having to write a custom events handler to run dispatches at the end of the current rendering cycle as part of making these portals work, as well as a WorldMap handler specifically to handle the metadata outside of each individual map.
Working feverishly, hour after hour, I finally had everything functioning as intended, except for enemy persistence. By now, it was nearly two in the morning. I had intended on composing an original song for this game, but some part of me warned myself that I might not have time for that on the final day, so I listened to a few of my older compositions and picked the best-fitting one as my backup soundtrack.
Lesson Learned: Things will take longer than expected, so account for that when planning.
Utterly exhausted, I collapsed into bed and tried to fall asleep. I tossed and turned, and I growled mentally at my body for being so stubborn…but sleep continued to evade me. At that point, thoughts flooded into my mind about how every minute I spent awake in bed would lead to one less minute of sleep I’d get, because I absolutely could not afford to sleep in late this time, like I did the other days.
After hours of this dreadful torture, I did finally fall asleep, but not for very long.
Dread Realizations (Monday)
At 8:00 a.m., the alarm blared and yanked me out of my fitful slumber. Compared to the other days, my mind was besot with grog and lack of clarity from the get-go. I plodded to the fridge, grabbed an energy drink, and started downing it. I had no time to think, no time to reflect; I had to finish enemy persistence, and whatever other little things I’d forgotten, to at least get the game to a playable state.
I thrust myself into the chair before my laptop and got to work. In another couple of hours, I got the enemies to correctly persist across maps. I also implemented a maximum enemy amount per map, and a rate which enemies would spawn/respawn into the map. I also threw in some simple ending screens to test the end-game conditions.
It was past noon by the time I got all this working. Meanwhile, my wife was playtesting builds of the game on another machine, and I would need to run back out there multiple times and pull down the latest builds for her to test with.
At this point, with the core loop finally in place, I decided to start looking around for final art assets. The ones I’d been testing with weren’t bad, but they didn’t quite fit together, and it bugged me enough that I chose to divert time into searching for new assets. Hours passed, and before I knew it the time was 4:00 p.m., and all I had to show for it was a single tileset and new sprites for the character.
The deadline was at 8:00 p.m. In short, I now had four hours to create the actual levels, create music, create sound effects, add story text and cinematics, upload the game to a server, test everything…that’s when it finally hit me: I’m not going to be able to release my full envisioning of the game.
It was at this point that my bipolar symptoms, hitherto under control, started to flare up strongly. Dark thoughts filled my mind about how badly I’d executed this game, how unlikely it was that I would even be able to get it finished. Every tiny little mistake I’d made, from the botched slopes to the overly-long search for a new tileset, flooded into my mind.
“You’re not good enough for this,” my brain whispered to me. “You did your best, but it wasn’t good enough and you’re going to fail.”
I kept trying to push forward with making levels. Nearly an hour later, I only had a single map that looked somewhat decent, and my mental anguish only intensified with each passing minute. There were now entire minutes where I’d find myself paralyzed with derision, my mind crushed under the anguishing weight of despair, my body unwilling to even move a single muscle. It had been a long, long time since I’d felt such intense levels of depression, and this scared me most of all. If this is what it’s going to be like every time, how can I justify making games in the future?
Sanity Wars, indeed. The imagined narrative of my game — of which I had yet to even write a single line of text — proved utterly ironic as the villain of my game threatened to consume the game’s creator.
Somehow, despite mostly working in fits and spurts, I kept forcing myself onward, even as my depression screamed at me about the futility of such gestures. My wife helped out by creating a map of her own, and I threw together a few additional barebones maps with a few randomly-drawn platforms. I found a few open-source sound effects to combine with my sfxr-generated effects I’d already put into the game, and I also took the backup music I’d selected the night before and added it as the game’s soundtrack.
Somehow, with less than two hours until the deadline, I wound up with a playable game. It was nowhere near the game I’d envisioned it to be when I started the competition; compared to that, it was abhorrent, abominable, awful garbage. Yet…it was still a game, and it was playable.
The Dread Overlord was still doing his best to crush my mentality and inconvenience my efforts, but, nevertheless, I slogged on. At this point, I had steeled my resolve. It was going to be a crap game, it wasn’t going to capture the theme nearly as well as I’d planned, and it was surely not going to do well…but I was going to finish and release it, flaws be damned!
The Final Push (Monday Night)
Now that I had something to release, it was time to ensure that the game did get released. Although it felt a little early–I still had an hour and a half of time–I decided to go ahead and set up the release platform for my game, so I wouldn’t be scrambling to do it at the literal final hour. As this was a web-based game, my plan was to host this as an AWS S3 website, where I wouldn’t have to deal with setting up and hosting a server, or learning some other company’s setup for their own hosting service. My decision to tackle this now would prove fortunate.
I mentioned previously that I’d built my game-engine based on a tutorial book. Said tutorial book gave instructions on how to set up a dev server called Budo for use with the testing environment…but, it turned out, had not provided any instruction on how to actually deploy the finished app to production. Scrambling, I rapid-researched how Budo ran under the hood, discovered it was using Browserify, and figured out how to set up Browserify to deploy a production build of my game script. After a few other snafus, I managed to correctly set up a deployment script.
Now it was time to create the S3 bucket-site and copy my production assets into it. In my depression-paralyzed state, I screwed up my first deployment attempt and spent almost half an hour trying to fix my AWS permissions before finally opting to blast the first site and make a new one. The second time through, I set the configuration correctly, and the deployment worked as intended. With less than an hour to go before the deadline, I at least knew I could reliably deploy the game.
I used every minute of that last hour to add as much polish as I dared get away with. By now, the adrenaline of deadline crunch was overcoming the dread weight of my depression, so I was singularly focused on trying to make my game at least not absolutely terrible. I converted my test ending screens into actual ending screens, so that I could at least get some of the story’s context into the game. My wife helped by writing the actual dialogue for the ending scenes, while I crafted the introductory scene establishing the game’s tone. We got the final words in, and deployed, at literally the last possible second, at 8:00 p.m.
At the end of the deadline, Ludum Dare allowed for a single hour to get the game deployed, and to fix any last-minute bugs that come up during this process. I honestly don’t recall much of what I did at this time, other than fixing a few things. At the end of it, I belatedly marked the game as “Unfinished” as I crafted the submission post. It only seemed fair, with the game in a barely-publishable state, to mark it as such. When I made my submission post, however, another fellow Ludum Dare-r messaged me, advising me to mark the game as “Jam” instead of “Unfinished”, pointing out that hardly anyone was going to play a marked-unfinished game, and I thus wouldn’t get any feedback on where I could improve. Deciding that I could at least treat this as an improvement opportunity, I took the person’s advice and changed my submission type to “Jam”.
Shortly after I did this, 9:00 p.m. hit. The competition was truly over, and now no changes were allowed. I collapsed onto the living room couch, utterly exhausted and in a foul state of mind. My wife tried to cheer me up, to focus on the fact that I had actually finished and released the game. I wasn’t quite ready to rejoice over that fact, especially since I found myself dreading the horrible reviews which would surely come.
But she was right: I had finished the game. It was a poor excuse of a game, in my mind, but I had actually done it. I’d built a game in three days, and on my first-ever attempt at such a feat. It wasn’t at the standard of quality that I hold myself to, but it was something.
Ultimately, I opted to push all thoughts of self-review and criticism out of my mind until I had gotten a good night’s rest. Fumbling my way through my regular nightly routines, I fell asleep mere minutes after tumbling onto the bed. It was a deep, deep slumber.
The Judgment
I didn’t get out of bed until nearly 10:00 a.m. the next morning. Immediately I noticed an improvement in my mood; sleep had seemed to help tremendously. At the least, I could finally acknowledge to myself that, yes, I had finished a game, and take some pride in that fact.
Lesson Learned: Never underestimate the value of good sleep. Working rested makes a huge difference not only in how you feel, but in the quality of work you output.
Now that the development part of the competition was over, each participant in the jam was expected to play each other’s games, rate them, and provide feedback. I hopped onto my desktop and started checking out the various games. I played a lot of clever implementations of the sacrifice theme: as a game mechanic, as part of a narrative, as the goal for the game…the creativity from the other developers was on full display.
All the while, I kept checking back on my own game. To my surprise, people were not only playing the game…they didn’t completely hate it. Sure, there were critiques on numerous aspects of the game, many of which I was expecting; but there were also plenty of positive comments about some things which they thought I’d done well: the choice of game genre, the incorporation of spellcasting, the visuals and audio… I hadn’t been expecting anything positive, so these comments pleasantly surprised me.
Over the course of the month of December, I continued to play other games (though not as many as I’d have liked, due to work obligations and the holiday season) and give my own ratings and feedback. Other people continued to play my own game and leave their feedback.
At last, at the beginning of January, the ratings period was officially over, and the scores were released for every game. I logged onto the site, and found my results:
The final results from my debut game entry, Sanity Wars.
With my own numbers known, I went to check on the overall stats for the jam, from which I’d learn how high my score truly was:
The overall statistics from Ludum Dare 43.
There were 2,514 submissions. Of these, 1,494 had received enough ratings (20 or more) to be awarded an official ranking.
Thus, my final placement: 842nd out of 1,494. Right in the middle of the pack.
To me, the final score was both surprising and expected. Expected, because this was within the middling range where I felt I’d wind up with my first-ever game entry. Surprised, because I never expected this flawed, imperfect game to score so highly. It still amazes me even now, as I type this retrospective.
It just goes to show: Never give up, even when all hope seems lost. This adage is a mantra that I try to live by, contending with my bipolar disorder, and time and time again I find it to be a true maxim. With my emotions screaming failure, I persevered and found triumph.
I Am Now a Video Game Developer
It’s official, now. Having designed, built, and released a video game, one which people were able to play, I am now a video game developer. It feels good to say that, after all the learning and preparation I put in to get to this point.
Overall, this competition was an incredible experience for me, in many ways. I set out to make my first-ever game, and I not only succeeded, I did better than I expected of my entry. Though I still wish I had been able to release a more polished game, the experience I’ve gained was invaluable, and will prove critical to my future endeavors to publish a full-fledged video game.
Among the things I learned: coding a game engine from scratch is hard. I mean, I knew that, and I knew that the main reason I did build an engine was to learn how things worked from a general perspective, but it gave me a whole new appreciation for the work game engine developers put in to make usable, reliable engines for others to use. Although I like tinkering with systems and how things work under the hood, Sanity Wars drove home a well-worn adage in the games industry: make games, not engines.
I also think I tried too hard to come up with a complex narrative for a game that, ultimately, did not need much narrative involvement. Presenting an allegory of the bipolar struggle may be neat for short stories, but it didn’t translate well into a game. I’m a narrative-oriented person, so I like creating complex narratives; however, by focusing too hard on cleverly implementing sacrifice in Sanity Wars‘ narrative, I instead sacrificed the fun of the game mechanics. In the end, I felt neither the narrative nor the spell sacrifice was well-implemented, and I could have done both more simply by highlighting the sacrificial nature of tying spellcasting to your health.
My goal with taking part in Ludum Dare was to gain experience, and in that regard I achieved success. Most of all, I learned that I can, indeed, create video games, and that this is something I want to keep doing, depression be damned
To put it in a melodramatic way…I faced the Dread Overlord, and conquered him
What’s Next?
I am currently working on rebuilding Sanity Wars in Godot, an open-source game engine, and comparing the experience to coding everything by hand. I suspect it might ease many of the pain points I had developing my game and engine.
Why did I choose Godot, over something more familiar to my background, such as PhaserJS? Well, I read plenty of good things about its ease of use, and the node-based architecture is very similar to the structure I used in my own engine. Plus, I thought it’d be nice to have a GUI to work with, instead of coding everything by hand. I plan on releasing the Godot version of Sanity Wars once I’ve finished the port.
The next Ludum Dare is at the end of April. I’ve already made sure to take time off for the dates of that contest. I look forward to taking on whatever challenges it throws my way, with the goal of releasing a more polished game.
As for my dream of making a professional video game? That dream is alive and well, and as I continue to learn and grow my skills, my confidence that this dream can be realized continues to grow. And as long as I keep moving forward, and don’t give up, I have no doubt that one day this will no longer be a dream.
It will be reality.
You can play the Ludum Dare version of Sanity Wars here.